Are you looking to expand your indoor plant collection without breaking the bank? Look no further than this step-by-step guide on propagating indoor plants from cuttings! Whether you’re a seasoned plant parent or just starting out, propagating plants from cuttings is a rewarding and cost-effective way to grow your indoor jungle. In this blog post, we’ll walk you through the entire process, from selecting the right plants to caring for your new cuttings. So, grab your gardening tools and let’s get started on this exciting journey of plant propagation!

Choosing the Right Indoor Plants for Propagation: A Step-by-Step Guide
Introduction
Indoor plants not only add beauty to our homes but also have numerous benefits for our well-being. Propagating indoor plants from cuttings is an exciting and rewarding way to expand your plant collection without spending a fortune. In this step-by-step guide, we will explore the process of choosing the right indoor plants for propagation, ensuring successful results and healthy plant babies.
Understanding the Basics of Propagation
Propagation is the process of creating new plants from existing ones, and it can be done through various methods such as seed sowing, division, and cuttings. When it comes to indoor plants, cuttings are a popular and effective method. Cuttings involve taking a portion of a plant, usually a stem or leaf, and encouraging it to develop roots and grow into a new plant.
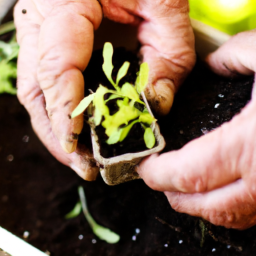
Step 1: Selecting the Parent Plant
The first step in propagating indoor plants from cuttings is selecting the right parent plant. Look for healthy, mature plants that have vibrant foliage and show no signs of disease or pests. It’s also essential to choose a plant that is suitable for propagation through cuttings. While most indoor plants can be propagated this way, some plants, like succulents, may require different methods.
Consider the growth habit of the plant as well. Some plants, like pothos or spider plants, produce long trailing stems that are perfect for cuttings. Others, like snake plants or rubber plants, have sturdy stems that can be easily propagated. Choose a plant that suits your preferences and fits well within your indoor space.
Step 2: Gathering the Tools and Materials
Before you start taking cuttings, gather all the necessary tools and materials. You will need a clean, sharp pair of pruning shears or scissors to make clean cuts without damaging the plant. Prepare a clean container filled with a well-draining potting mix or a mixture of perlite and peat moss. This will provide the right environment for root development.
Additionally, have some rooting hormone on hand. While not always necessary, rooting hormone can help speed up the rooting process and increase the chances of success. Lastly, have a spray bottle filled with water to mist the cuttings and maintain humidity during the rooting process.
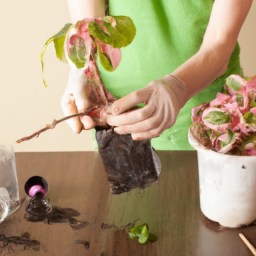
Step 3: Taking the Cuttings
Now that you have everything ready, it’s time to take the cuttings. Look for healthy stems that have at least two to three nodes. Nodes are the points on the stem where leaves emerge. Using your clean shears or scissors, make a clean cut just below a node. Remove any lower leaves, leaving only a few at the top.
If the plant has long trailing stems, you can take multiple cuttings from different sections. However, ensure that each cutting has enough nodes and leaves to support root development. Once you have taken the cuttings, immediately place them in a container of water or moist paper towels to prevent them from drying out.
Step 4: Preparing the Cuttings for Rooting
After taking the cuttings, it’s time to prepare them for rooting. If you are using rooting hormone, dip the bottom end of each cutting into the hormone, tapping off any excess. This will help stimulate root growth. If you don’t have rooting hormone, don’t worry. Many plants can still root successfully without it.
Next, make a small hole in the potting mix using a pencil or your finger. Gently insert the bottom end of each cutting into the hole, ensuring that at least one node is covered with the potting mix. Firmly press the soil around the cutting to provide stability.
Step 5: Rooting and Care
Once the cuttings are planted, it’s time to provide the right conditions for rooting and care. Place the container in a warm and bright location, but avoid direct sunlight as it can scorch the cuttings. Maintain a consistent level of humidity by misting the cuttings and covering the container with a plastic bag or a propagator lid.
Check the moisture level of the potting mix regularly and water as needed to keep it slightly moist but not waterlogged. Avoid overwatering, as it can lead to root rot. After a few weeks, gently tug on the cuttings to check for resistance, indicating root development. Once roots have formed, you can gradually acclimate the new plants to normal indoor conditions.
Conclusion
Propagating indoor plants from cuttings is a wonderful way to expand your plant collection and share the joy of gardening with others. By following this step-by-step guide and choosing the right indoor plants for propagation, you can enjoy the satisfaction of watching your cuttings develop into healthy and thriving plants. Remember to be patient, as propagation takes time, and don’t be discouraged by occasional failures. With practice and care, you’ll become an expert at propagating indoor plants and enjoy the beauty and benefits they bring to your home.
Essential Tools and Materials for Propagating Indoor Plants from Cuttings: A Step-by-Step Guide
Introduction
Propagating indoor plants from cuttings is an exciting and rewarding way to expand your plant collection. Not only does it allow you to create new plants from existing ones, but it also gives you the opportunity to share your love for gardening with others. To successfully propagate indoor plants from cuttings, you will need a few essential tools and materials. In this step-by-step guide, we will walk you through the process and provide you with all the information you need to get started.
1. Pruning Shears
Pruning shears are a must-have tool for propagating indoor plants from cuttings. These specialized scissors are designed to make clean cuts without damaging the plant tissue. When selecting pruning shears, opt for a high-quality pair that feels comfortable in your hand and has sharp blades. Dull blades can crush the stem, making it harder for the cutting to root successfully. Remember to clean and sanitize your pruning shears before and after each use to prevent the spread of diseases.
2. Rooting Hormone
Rooting hormone is a valuable tool that can significantly increase the success rate of propagating indoor plants from cuttings. It contains growth-promoting substances that stimulate root development and help the cutting establish itself as a new plant. There are different types of rooting hormones available, including powder, gel, and liquid forms. Choose the one that suits your preference and follow the instructions provided on the packaging for the best results.
3. Growing Medium
A suitable growing medium is crucial for successful propagation. It provides the necessary nutrients, moisture, and aeration for the cutting to develop roots. There are several options for a growing medium, including perlite, vermiculite, peat moss, or a combination of these materials. You can also use a specialized seed-starting mix, which is formulated to promote root growth. Whichever medium you choose, ensure it is well-draining to prevent waterlogged conditions that can lead to root rot.
4. Containers
Choosing the right containers for your cuttings is essential. Opt for small pots or trays with drainage holes to prevent water accumulation. Plastic containers are lightweight and easy to handle, while terracotta pots provide better airflow to the roots. Make sure the containers are clean and sterilized before use to minimize the risk of fungal or bacterial infections. Additionally, consider using clear plastic bags or propagation domes to create a humid environment that promotes root development.
5. Watering Can or Spray Bottle
Maintaining proper moisture levels is crucial during the propagation process. A watering can with a narrow spout or a spray bottle can be used to gently water the cuttings without disturbing the delicate roots. Avoid overwatering, as it can lead to rotting or fungal issues. Instead, aim for a moist, but not soggy, growing medium. Regularly check the moisture levels and adjust your watering routine accordingly.
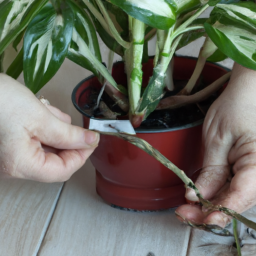
6. Labels
Keeping track of the different plant varieties and their propagation progress is essential, especially if you are propagating multiple cuttings at once. Use labels or markers to identify each cutting and note down any relevant information, such as the date of propagation or specific care requirements. This will help you monitor their growth and make adjustments as needed.
Conclusion
Having the right tools and materials is crucial for successfully propagating indoor plants from cuttings. Pruning shears, rooting hormone, a suitable growing medium, containers, a watering can or spray bottle, and labels are all essential for this process. By investing in these tools and following the step-by-step guide provided, you can enjoy the satisfaction of growing your own indoor plants from cuttings. Happy propagating!
Step-by-Step Propagation Techniques for Different Types of Indoor Plants: A Comprehensive Guide
Introduction
Indoor plants not only add beauty to our homes but also provide numerous health benefits. Propagating indoor plants from cuttings is a cost-effective and rewarding way to expand your plant collection. Whether you’re a seasoned gardener or just starting out, this step-by-step guide will walk you through the propagation techniques for different types of indoor plants. So, roll up your sleeves and let’s get started!
1. Water Propagation
Water propagation is a popular method for propagating indoor plants that have soft stems or leaves. Here’s how you can do it:
Gather Your Supplies
To begin, gather the following supplies:
– A glass jar or vase
– Filtered or distilled water
– Scissors or a sharp knife
– Rooting hormone (optional)
Take the Cutting
Select a healthy stem or leaf cutting from the parent plant. Make sure it’s at least 4-6 inches long and has a few nodes. Nodes are the points where leaves or branches emerge from the stem.
Prepare the Cutting
Remove any leaves from the lower part of the cutting, leaving only a few at the top. This will prevent them from rotting in the water. If desired, dip the cut end of the stem in rooting hormone to promote root development.
Place in Water
Fill the glass jar or vase with filtered or distilled water, ensuring that the nodes of the cutting are submerged. Place the container in a bright location, away from direct sunlight. Change the water every few days to prevent the growth of bacteria.
Wait for Root Development
Over time, you’ll start to see roots emerging from the nodes of the cutting. Once the roots are at least an inch long, you can transfer the cutting to a pot with well-draining soil.
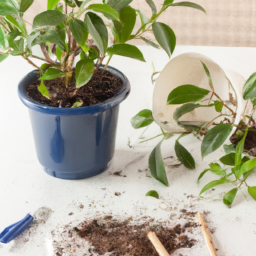
2. Soil Propagation
Soil propagation is suitable for plants with thicker stems or those that prefer a drier environment. Follow these steps for successful soil propagation:
Prepare the Potting Mix
Start by preparing a well-draining potting mix. A mixture of equal parts peat moss, perlite, and vermiculite works well for most indoor plants. Fill a small pot or seed tray with the potting mix, leaving about an inch of space at the top.
Take the Cutting
Select a healthy stem cutting from the parent plant, ensuring it has a few nodes. Using a clean and sharp knife or scissors, make a clean cut just below a node.
Remove Lower Leaves
Remove the lower leaves from the cutting, leaving only a few at the top. This will prevent them from rotting in the soil.
Plant the Cutting
Make a small hole in the potting mix and gently insert the cutting, ensuring that at least one node is below the soil surface. Firmly press the soil around the cutting to provide stability.
Provide Adequate Moisture
Water the potting mix thoroughly after planting to settle it around the cutting. Place the pot in a warm and bright location, but avoid direct sunlight. Keep the soil slightly moist but not waterlogged.
Monitor and Transplant
Monitor the cutting regularly for signs of root development. Once the roots have established, usually after a few weeks, you can transplant the cutting into a larger pot with regular potting soil.
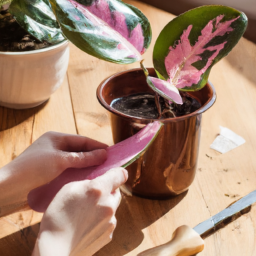
3. Leaf Propagation
Leaf propagation is a unique method that allows you to grow new plants from individual leaves. This technique works best for plants with fleshy or succulent leaves. Here’s how you can do it:
Select Healthy Leaves
Choose healthy and mature leaves from the parent plant. Make sure they are free from any damage or disease.
Prepare the Leaf
Gently twist or cut the leaf from the parent plant, ensuring that a small portion of the stem (petiole) is attached. This will serve as the anchor for the leaf cutting.
Allow Callus Formation
Place the leaf cutting on a tray or plate and allow it to dry for a few days. This will promote callus formation, which is crucial for root development.
Plant the Leaf
Prepare a small pot with well-draining soil. Make a small hole in the soil and insert the petiole of the leaf cutting. Ensure that the leaf is resting on the soil surface.
Maintain Humidity
To maintain humidity around the leaf cutting, cover the pot with a clear plastic bag or place it in a propagator. This will create a mini greenhouse effect and promote root growth.
Be Patient
Leaf propagation can be a slow process, so be patient. It may take several weeks or even months for roots to develop. Once the roots are established, you can remove the plastic cover and treat the new plant as a mature indoor plant.
Conclusion
Propagating indoor plants from cuttings is a fascinating and rewarding experience. Whether you choose water propagation, soil propagation, or leaf propagation, each method offers its own unique set of challenges and rewards. By following these step-by-step techniques, you can expand your indoor plant collection and enjoy the satisfaction of growing new plants from cuttings. So, grab your gardening tools and embark on this green journey today!
Key Takeaways
If you’re a plant lover like me, you probably can’t resist the idea of having more indoor plants without spending a fortune. Well, I’ve got great news for you! Propagating indoor plants from cuttings is an easy and cost-effective way to expand your plant collection. In this step-by-step guide, I’ll walk you through the process, so you can become a pro at propagating your favorite indoor plants.
First things first, you’ll need to gather some essential materials. Grab a pair of clean, sharp scissors or pruning shears, a clean container filled with water or a suitable rooting medium, and of course, the plant you want to propagate. Once you have everything ready, it’s time to start the process. Begin by selecting a healthy stem or branch from your plant. Make sure it’s long enough and has a few nodes or leaf joints. Using your scissors, make a clean cut just below a node, as this is where the roots will develop. Remove any leaves from the lower part of the cutting to avoid them rotting in the water or soil. Now, you can place the cutting in water or directly into your chosen rooting medium. If you opt for water, ensure that only the bottom part of the cutting is submerged. If you’re using a rooting medium, gently insert the cutting into the soil, making sure it stands upright. Now, all you need to do is provide your cutting with the right conditions: bright but indirect light, consistent moisture, and warmth. With a little patience, you’ll soon see roots forming, and once they’re well-established, you can transfer your new plant into a pot with potting soil. Voila! You’ve successfully propagated your indoor plant from a cutting. So, why not give it a try and watch your plant family grow?
Your Burning Questions Answered:
Q1: What is propagating indoor plants from cuttings?
A1: Propagating indoor plants from cuttings is a method of growing new plants by taking a portion of an existing plant, such as a stem or leaf, and encouraging it to develop roots and grow into a separate plant. It’s a popular way to expand your indoor plant collection without having to purchase new plants.
Q2: How do I choose the right plant for propagation?
A2: When selecting a plant for propagation, it’s important to choose a healthy and mature plant. Look for a plant with no signs of disease or pests and select a stem or leaf that is strong, plump, and free from any damage. Additionally, some plants are better suited for propagation than others, so it’s a good idea to do some research and choose a plant that is known to be easily propagated from cuttings.
Q3: What materials do I need for propagating indoor plants from cuttings?
A3: To propagate indoor plants from cuttings, you’ll need a few basic materials. These include a clean pair of pruning shears or a sharp knife to take the cuttings, a clean container or pot with well-draining soil or a rooting medium, and a clear plastic bag or a propagator to create a humid environment for the cuttings to root.
Q4: What is the step-by-step process for propagating indoor plants from cuttings?
A4: The step-by-step process for propagating indoor plants from cuttings involves several key stages. First, take a healthy cutting from the parent plant. Then, remove any lower leaves from the cutting and dip the cut end into a rooting hormone if desired. Next, plant the cutting in a container with well-draining soil or a rooting medium and water it thoroughly. Finally, cover the container with a clear plastic bag or propagator to create a humid environment and place it in a warm and bright location, avoiding direct sunlight.
Q5: How long does it take for cuttings to root and grow into new plants?
A5: The time it takes for cuttings to root and grow into new plants can vary depending on the type of plant and environmental conditions. Generally, it takes about 2-6 weeks for roots to develop, but some plants may take longer. Once the roots have formed, you can gradually acclimate the new plant to its growing conditions and eventually transplant it into a larger pot or garden bed.
Dr. Olivia Green is a botanist with over two decades of experience in indoor plant cultivation. She holds a Ph.D. in Plant Biology and has dedicated her career to researching plant behavior in controlled environments. Dr. Green is passionate about helping plant enthusiasts master the art of indoor gardening through her extensive knowledge and practical insights.