Are your indoor plants starting to look a little cramped in their pots? It might be time for a repotting! Welcome to our repotting guide: when and how to repot your indoor plants. Repotting is an essential task for plant owners, as it allows your plants to continue growing and thriving in a healthy environment. In this guide, we will walk you through the signs that indicate your plants need repotting, as well as the step-by-step process of repotting them successfully. So, grab your gardening gloves and let’s dive into the wonderful world of repotting indoor plants!

Importance of Repotting Indoor Plants: Understanding the Benefits and When to Repot
Indoor plants not only add beauty and freshness to our living spaces but also provide numerous benefits for our well-being. However, to ensure their healthy growth and longevity, it is crucial to understand the importance of repotting. Repotting is the process of transferring a plant to a larger container, allowing its roots to have more space to grow and access essential nutrients. In this guide, we will explore the benefits of repotting and provide you with a step-by-step guide on when and how to repot your indoor plants.
The Benefits of Repotting Indoor Plants
Repotting offers several advantages for the overall health and vitality of your indoor plants. Here are some key benefits:
1. Enhanced Growth and Development
When a plant outgrows its current pot, its roots become cramped and restricted. By repotting, you provide the plant with more space for root expansion, allowing it to grow and develop to its full potential. This leads to healthier foliage, increased flower production, and overall improved plant vitality.
Additionally, repotting provides an opportunity to replenish the soil with fresh nutrients, promoting optimal growth and preventing nutrient deficiencies.
2. Improved Drainage and Aeration
Over time, the soil in your indoor plant’s pot may become compacted, hindering proper drainage and airflow. Repotting allows you to refresh the soil, ensuring that excess water can drain effectively and preventing the risk of root rot. It also enhances aeration, allowing roots to breathe and absorb oxygen more efficiently.
3. Prevention of Root Bound Conditions
Root bound occurs when a plant’s roots become tightly packed, circling around the pot. This condition restricts the plant’s ability to absorb water and nutrients, leading to stunted growth and increased susceptibility to diseases and pests. By repotting regularly, you prevent root bound conditions and ensure your indoor plants thrive.
When to Repot Your Indoor Plants
Knowing when to repot your indoor plants is crucial to their well-being. Here are some signs that indicate it’s time to repot:
1. Root Overcrowding
If you notice that the roots are tightly packed and circling around the pot, it’s a clear indication that your plant needs a larger container. Gently remove the plant from its current pot to examine the root system. If the roots are filling the pot and have no room to grow, it’s time to repot.
2. Slow Growth and Wilting
If your indoor plant’s growth has significantly slowed down, and leaves are wilting despite regular watering, it may be a sign that the roots are struggling to access water and nutrients. Repotting can provide the necessary space for root expansion and rejuvenate the plant’s growth.
3. Pot-Bound Roots
Pot-bound roots are visible through the drainage holes at the bottom of the pot. If you notice a dense mass of roots, it’s an indication that your plant has outgrown its current container. Repotting will prevent further root constriction and promote healthier growth.
How to Repot Your Indoor Plants: A Step-by-Step Guide
Now that you understand the benefits of repotting and when to repot, let’s dive into the step-by-step process of repotting your indoor plants:
1. Choose the Right Pot
Select a pot that is one size larger than the current pot. Ensure it has drainage holes to prevent waterlogging. Ceramic or plastic pots are common choices, but consider the specific needs of your plant for optimal growth.
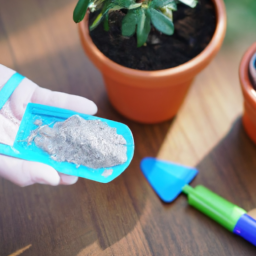
2. Prepare the Potting Mix
Use a well-draining potting mix suitable for your plant type. You can create a mix by combining equal parts of peat moss, perlite, and vermiculite. This blend provides excellent drainage while retaining enough moisture for healthy root growth.
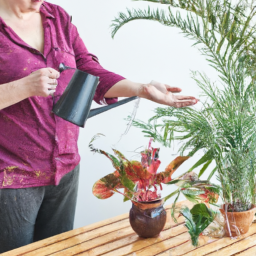
3. Water the Plant
Before repotting, water your indoor plant thoroughly to ensure it is well-hydrated. This will ease the process of removing it from the current pot and minimize stress on the roots.
4. Gently Remove the Plant from the Pot
Place your hand over the top of the pot and invert it while supporting the base of the plant’s stem. Gently tap the bottom of the pot to loosen the root ball and carefully slide the plant out.
5. Inspect and Prune the Roots
Examine the roots for any signs of damage, rot, or pests. Trim away any unhealthy or excessively long roots using clean, sterilized pruning shears. This encourages new root growth and prevents potential issues.
6. Repot the Plant
Place a layer of fresh potting mix at the bottom of the new pot. Position the plant in the center and add more potting mix, gently pressing it around the roots to ensure stability. Leave some space at the top to allow for watering.
7. Water and Adjust
After repotting, give your plant a thorough watering to settle the soil and eliminate air pockets around the roots. Adjust the plant’s position if needed and ensure it is at the same depth as before.
8. Care Instructions
Place your repotted indoor plant in an appropriate location with adequate light and temperature conditions. Follow the specific care instructions for your plant regarding watering, fertilizing, and pruning to maintain its health and promote optimal growth.
By understanding the importance of repotting, recognizing the signs, and following the step-by-step guide, you can ensure the well-being of your indoor plants. Repotting not only enhances their growth and development but also prevents root-bound conditions, improves drainage, and provides a fresh supply of nutrients. Enjoy the process of repotting and watch your indoor plants flourish!
Step-by-Step Guide: How to Repot Your Indoor Plants for Optimal Growth and Health
Introduction
Welcome to the step-by-step guide on repotting your indoor plants for optimal growth and health. Repotting is an essential task that helps your plants thrive by providing them with fresh nutrients, adequate space, and a conducive environment for root development. In this guide, we will walk you through the process of repotting your indoor plants, ensuring that you have all the necessary information and tools to successfully complete this task.
1. Assessing the Need for Repotting
The first step in repotting your indoor plants is to assess whether they actually need repotting. Signs that indicate your plant may require repotting include roots growing out of the drainage holes, stunted growth, water draining too quickly, or the plant becoming top-heavy. Carefully examine your plant’s condition and consider whether it has outgrown its current pot.
If you determine that your plant needs repotting, proceed to the next step. However, if your plant is still thriving and doesn’t show any signs of being root-bound or overcrowded, you can postpone repotting until it becomes necessary.
Remember, not all plants require repotting at the same frequency. Some plants, like succulents, prefer to be slightly root-bound, while others may need more frequent repotting. Research the specific needs of your plant species to ensure you are providing the best care.
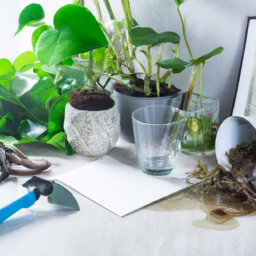
2. Gathering the Necessary Tools and Materials
Before you begin the repotting process, gather all the tools and materials you will need. This will help you work efficiently and minimize any stress on your plants. Here are the essential items you will need:
- A new pot that is one size larger than the current pot
- Well-draining potting mix
- A trowel or gardening scoop
- A watering can or spray bottle
- Pruning shears or scissors (for pruning any damaged or overgrown roots)
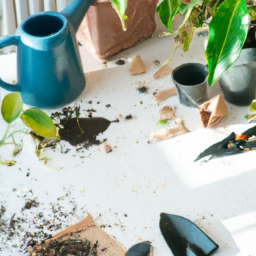
3. Preparing the New Pot
Before transferring your plant to a new pot, it is important to prepare the pot to create a suitable environment for your plant’s roots. Follow these steps:
- Clean the new pot thoroughly with mild soap and water to remove any dirt or residue.
- Ensure the new pot has drainage holes at the bottom to prevent waterlogging.
- Place a layer of small stones or broken pottery pieces at the bottom of the pot to improve drainage.
- Add a layer of fresh potting mix on top of the drainage layer to provide nutrients for your plant.
4. Removing the Plant from its Current Pot
Gently remove the plant from its current pot by following these steps:
- Water your plant a day or two before repotting to ensure the soil is slightly moist, making it easier to remove the plant.
- Hold the base of the plant’s stem with one hand and turn the pot upside down with the other hand.
- Tap the bottom of the pot or gently squeeze the sides to loosen the plant’s root ball.
- Once the root ball is loose, carefully slide the plant out of the pot.
5. Inspecting and Pruning the Roots
Inspect the plant’s roots for any signs of damage, disease, or overgrowth. Trim any damaged or excessively long roots using pruning shears or scissors. This will help stimulate new root growth and prevent any potential issues.
Additionally, if the plant is severely root-bound, gently tease the roots apart to encourage outward growth. This will enable the roots to absorb nutrients and water more effectively in the new pot.
6. Placing the Plant in the New Pot
Now it’s time to transfer your plant to its new pot. Follow these steps:
- Position the plant in the center of the new pot, ensuring it is at the same depth as it was in the previous pot.
- Add fresh potting mix around the sides of the root ball, gently pressing it down to eliminate any air pockets.
- Continue adding potting mix until the root ball is covered and the plant is stable.
- Water the plant thoroughly to settle the soil and ensure proper hydration.
7. Aftercare and Maintenance
Once you have repotted your indoor plant, it is crucial to provide proper aftercare to ensure its successful transition. Here are some essential tips:
- Place the repotted plant in an appropriate location with adequate light and temperature conditions for its specific species.
- Water the plant according to its specific watering requirements, taking care not to overwater or underwater.
- Monitor the plant closely for any signs of stress or adjustment issues, such as wilting leaves or yellowing.
- Resume regular fertilization according to the plant’s needs, usually after a few weeks of repotting.
Conclusion
Repotting your indoor plants is a rewarding task that promotes their optimal growth and health. By following this step-by-step guide, you now have the knowledge and confidence to successfully repot your plants. Remember to assess the need for repotting, gather the necessary tools, prepare the new pot, carefully remove the plant from its current pot, inspect and prune the roots, place the plant in the new pot, and provide proper aftercare. Enjoy watching your indoor plants flourish in their new homes!
Common Mistakes to Avoid When Repotting Indoor Plants: Tips for a Successful Repotting Experience
Repotting your indoor plants is an essential task that helps ensure their overall health and growth. However, it can be a daunting process if not done correctly. To help you avoid common mistakes and have a successful repotting experience, here are some valuable tips to follow:
1. Choosing the Wrong Pot Size
One of the most common mistakes people make when repotting indoor plants is selecting the wrong pot size. It’s crucial to choose a pot that provides enough space for your plant’s roots to grow, but not too large that it overwhelms the plant.
When selecting a new pot, consider the size of your plant’s root system. You want to choose a pot that is one or two sizes larger than the current one. This allows for some room for growth without causing the soil to retain too much moisture, which can lead to root rot.
Additionally, ensure that the new pot has drainage holes at the bottom. Proper drainage is essential to prevent waterlogged soil, which can also lead to root rot.
2. Neglecting to Use the Right Soil
The type of soil you use during repotting plays a crucial role in the overall health of your indoor plants. Using the wrong soil can lead to poor drainage, nutrient deficiencies, and even plant diseases.
When repotting, opt for a well-draining potting mix specifically formulated for indoor plants. Such mixes usually contain a blend of peat moss, perlite, and vermiculite, which provide adequate moisture retention while allowing excess water to drain away.
Avoid using garden soil or heavy clay-based soil, as they tend to compact and suffocate the roots. These soils also retain too much moisture, which can lead to root rot.
3. Failing to Properly Water After Repotting
Watering is a crucial step after repotting your indoor plants. However, many people either overwater or underwater their plants, leading to stress and potential damage.
After repotting, water your plant thoroughly until water drains out of the bottom of the pot. This helps settle the soil and ensures that it makes good contact with the roots. Allow the excess water to drain away completely before placing the pot back in its usual spot.
It’s important to note that overwatering can suffocate the roots and promote fungal growth, while underwatering can lead to dehydration and nutrient deficiencies. Therefore, it’s essential to strike a balance and provide your plants with adequate but not excessive moisture.
By avoiding these common mistakes, you can ensure a successful repotting experience for your indoor plants. Remember to choose the right pot size, use appropriate soil, and water your plants properly after repotting. With these tips in mind, your plants will thrive and continue to beautify your indoor space.
I’ll leave you with these final thoughts
Are your indoor plants looking a little cramped? It might be time to give them a new home! Repotting is an essential part of plant care that helps promote healthy growth and prevents root-bound plants. In this guide, we’ll walk you through the when and how of repotting your favorite indoor plants.
Knowing when to repot is crucial for the well-being of your plants. Signs that it’s time to give them a bigger pot include roots growing out of the drainage holes, slow growth, or if the soil dries out too quickly. Spring is generally the best time for repotting, as plants are entering their active growth phase. To begin the repotting process, gently remove the plant from its current pot, being careful not to damage the roots. Then, inspect the roots for any signs of rot or disease, and trim away any damaged or dead roots. Next, choose a new pot that is one size larger than the current one, ensuring it has drainage holes to prevent waterlogging. Fill the pot with fresh, well-draining potting mix, and place your plant in the center, making sure it’s at the same depth as before. Finally, water the plant thoroughly and place it in a spot with appropriate lighting for its specific needs. With a little TLC, your repotted indoor plants will thrive and bring beauty to your home.
Here are some FAQs you’d be interested in:
Q1: When should I repot my indoor plants?
A1: The ideal time to repot your indoor plants is when they outgrow their current container or when you notice their roots circling the bottom of the pot. This usually happens every 1-2 years for most houseplants. Keep an eye out for signs like stunted growth, roots growing out of drainage holes, or the plant becoming top-heavy.
Q2: How do I know if my indoor plant needs repotting?
A2: There are a few indicators that your indoor plant may need repotting. Look for roots growing out of the drainage holes, a pot that feels excessively heavy due to compacted roots, or if the plant is struggling to absorb water and nutrients despite regular watering. Additionally, if your plant is top-heavy and prone to tipping over, it may be time to repot.
Q3: What type of pot should I use for repotting?
A3: When repotting your indoor plants, it’s best to choose a pot that is slightly larger than the current one. Opt for a pot with drainage holes to ensure proper water drainage and prevent root rot. You can choose from a variety of materials such as ceramic, terracotta, or plastic, depending on your preference and the specific needs of your plants.
Q4: How do I repot my indoor plants without damaging them?
A4: To repot your indoor plants without causing harm, start by gently removing the plant from its current pot. Gently loosen the roots and remove any excess soil. Place the plant in its new pot, ensuring it sits at the same depth as before. Fill the remaining space with fresh, well-draining potting mix, pressing it gently to secure the plant. Water the plant thoroughly after repotting to help settle the soil.
Q5: Are there any special care instructions after repotting?
A5: After repotting your indoor plants, it’s important to provide them with some extra care. Avoid exposing newly repotted plants to direct sunlight for a few days to prevent stress. Water the plant thoroughly but avoid overwatering, as the roots may still be adjusting. Keep an eye on the plant’s condition and adjust watering and light levels accordingly. It may take a few weeks for the plant to fully adjust to its new pot.

James Wong is a renowned ethnobotanist, plant scientist, and local television presenter. With a passion for demystifying plant science, he is known for translating complex botanical concepts into practical advice for everyday plant enthusiasts. James’s expertise spans from traditional gardening to cutting-edge plant technologies, making his insights accessible and informative.