Hey there, plant enthusiasts! Are you looking for some tips on how to take care of your peace plant? Well, you’ve come to the right place! In this blog post, we will dive into the wonderful world of peace plants and explore the best practices for their care. Whether you’re a seasoned plant parent or just starting your green journey, we’ve got you covered. So, let’s get started and learn all about the care of peace plants!

Watering and Moisture Requirements for Peace Plants
Introduction
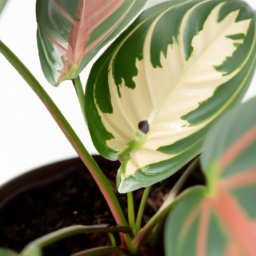
Peace plants, also known as Spathiphyllum, are popular houseplants known for their beautiful foliage and ability to purify the air. Proper care and maintenance are essential for the health and longevity of these plants. One crucial aspect of their care is understanding their watering and moisture requirements. In this article, we will delve into the details of how to water peace plants effectively, ensuring they thrive in your home or office space.
Understanding the Watering Needs
Peace plants have specific watering needs that must be met to keep them healthy. While they can tolerate some degree of neglect, overwatering or underwatering can lead to various issues, including root rot or dehydration. It is crucial to strike a balance and provide the right amount of water to your peace plant.
1. Assessing the Moisture Level
Before watering your peace plant, it is essential to assess the moisture level in the soil. Stick your finger about an inch deep into the soil. If it feels dry, it’s time to water the plant. However, if the soil feels slightly damp, it’s better to wait a little longer before watering. Over time, you will develop a sense of how often your peace plant requires watering based on the moisture level.
2. Watering Frequency
The frequency of watering your peace plant depends on various factors, including the size of the pot, environmental conditions, and the season. In general, peace plants prefer slightly moist soil, but they don’t appreciate being constantly wet. As a rule of thumb, water your peace plant when the top inch of soil feels dry. This usually translates to watering every 7-10 days, but it may vary based on the factors mentioned earlier.
3. Watering Techniques
When watering your peace plant, it’s crucial to use the right technique to ensure even moisture distribution and prevent waterlogging. Here are a few tips to help you water your peace plant effectively:
a. Bottom Watering
One effective method is bottom watering. Fill a tray or saucer with water and place your peace plant’s pot on top. Allow the plant to absorb water through the drainage holes at the bottom of the pot. Once the topsoil feels moist, remove the excess water from the tray. This method ensures that the roots receive adequate moisture without risking overwatering.
b. Watering from the Top
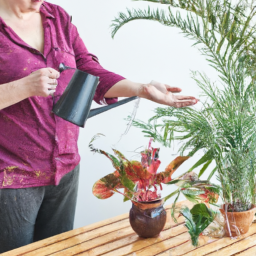
Alternatively, you can water your peace plant from the top. Use a watering can with a narrow spout to direct the water at the base of the plant, near the soil. Avoid splashing water on the leaves, as it can lead to fungal diseases. Water until you see the excess water draining out from the bottom of the pot, indicating that the soil is adequately moistened.
Preventing Overwatering
Overwatering is one of the most common mistakes made in peace plant care. It can lead to root rot, yellowing leaves, and ultimately the death of the plant. Here are some essential tips to prevent overwatering:
1. Well-Draining Soil
Ensure your peace plant is potted in well-draining soil. A mixture of potting soil, peat moss, and perlite or sand works well. This type of soil allows excess water to drain away, preventing waterlogged roots.
2. Adequate Drainage
Choose a pot with drainage holes to allow excess water to escape. This prevents water from accumulating at the bottom of the pot, which can suffocate the roots.
3. Monitoring Soil Moisture
Regularly check the moisture level of the soil by inserting your finger into the top inch of soil. If it feels moist, hold off on watering. Remember, it’s better to underwater than to overwater a peace plant.
Dealing with Underwatering
While overwatering is a common issue, underwatering can also harm peace plants. Signs of underwatering include wilting, yellowing leaves, and dry soil. Here’s how to address this problem:
1. Increase Watering Frequency
If you notice signs of underwatering, increase the frequency of watering. Monitor the soil moisture closely and adjust accordingly. Remember, consistency is key when it comes to watering peace plants.
2. Humidity and Mist
Peace plants thrive in a humid environment. If your home or office space has dry air, consider increasing humidity levels by placing a tray of water near the plant or using a humidifier. Additionally, misting the leaves occasionally can provide some relief from dry conditions.
3. Mulching
Applying a layer of organic mulch, such as bark chips or coconut coir, on the topsoil can help retain moisture and prevent rapid evaporation. This can be particularly beneficial if you live in a hot and dry climate.
Conclusion
Proper watering and moisture management are crucial for the well-being of peace plants. By understanding their specific needs, monitoring soil moisture, and using appropriate watering techniques, you can ensure your peace plant thrives and adds beauty to your indoor space. Remember, finding the right balance between underwatering and overwatering is key to maintaining a healthy and vibrant peace plant.

Sunlight and Lighting Needs for Peace Plants
Understanding the Sunlight Requirements of Peace Plants
Peace plants, also known as Spathiphyllum, are popular houseplants known for their beautiful foliage and ability to thrive in low-light conditions. However, it is essential to understand their sunlight and lighting needs to ensure their optimal growth and overall well-being.
Peace plants are native to the tropical rainforests of Central and South America, where they grow under the dense canopy of trees, receiving filtered and indirect sunlight. As a result, they have adapted to thrive in low-light environments, making them an excellent choice for indoor gardening.
While peace plants can tolerate low-light conditions, they still require some exposure to sunlight to maintain their health and vibrant appearance. Ideally, they should be placed in a location that receives bright, indirect light for a few hours each day. This can be near a north-facing window or a few feet away from an east or west-facing window. Avoid placing them in direct sunlight, as it can scorch their leaves and cause damage.
Providing Adequate Lighting for Peace Plants
When it comes to lighting peace plants, finding the right balance is crucial. While they can tolerate low-light conditions, they also need enough light to support their growth and flowering. Here are some tips to provide adequate lighting for your peace plant:
1. Natural Light: Place your peace plant near a window that receives bright, indirect light. North-facing windows are ideal, as they provide consistent, gentle light without the risk of direct sunlight. If you have east or west-facing windows, ensure that the plant is a few feet away from the window to prevent exposure to intense sunlight.
2. Artificial Lighting: If you don’t have access to natural light or your home lacks suitable windows, you can supplement the lighting with artificial sources. Use fluorescent or LED grow lights specifically designed for indoor plants. Position the lights a few feet above the peace plant and keep them on for 12-14 hours a day. This will mimic natural daylight and provide the necessary light energy for photosynthesis.
3. Light Intensity: Peace plants thrive in moderate to low-light conditions. Avoid placing them in areas with high-intensity light, such as directly under a spotlight or near strong artificial light sources. Excessive light can lead to leaf burn and hinder their growth. If you notice the leaves turning yellow or brown, it might be a sign of too much light exposure.
4. Light Duration: While peace plants can tolerate low-light conditions, they still require a minimum amount of light each day to thrive. Aim for at least 6 hours of indirect light daily. If you’re using artificial lighting, maintain a consistent schedule of 12-14 hours of light and 10-12 hours of darkness to simulate natural day and night cycles.
Troubleshooting Lighting Issues
Even with the best intentions, sometimes peace plants may not receive adequate lighting, leading to various issues. Here are some common problems and their solutions:
1. Leggy Growth: If your peace plant starts to grow tall and leggy, it is a sign of insufficient light. Move the plant to a brighter location or provide additional artificial lighting. Pruning the leggy stems can also promote bushier growth.
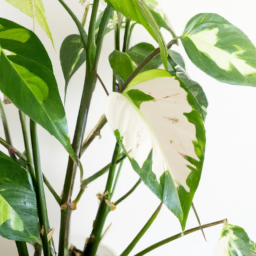
2. Lack of Blooms: Peace plants are known for their elegant white flowers. If your plant fails to bloom, it may not be receiving enough light. Ensure it is getting at least a few hours of bright, indirect light each day. Adjust the position or lighting setup accordingly.
3. Leaf Browning or Yellowing: If the leaves of your peace plant are turning brown or yellow, it could be due to excessive light exposure. Move the plant to a more shaded area or adjust the artificial lighting to reduce the intensity. Additionally, make sure you are not overwatering, as it can also cause similar symptoms.
Remember, peace plants are adaptable and forgiving, so with a little observation and adjustment, you can provide them with the perfect lighting conditions to thrive indoors.
Pruning and Propagation Techniques for Peace Plants
Introduction
Peace plants, also known as Spathiphyllum, are popular houseplants known for their beautiful foliage and ability to purify indoor air. To keep your peace plant healthy and thriving, it is important to understand the pruning and propagation techniques that will help maintain its shape and promote new growth. In this guide, we will explore the step-by-step process of pruning your peace plant and how to propagate it for new plants.
Pruning Your Peace Plant
Pruning plays a crucial role in maintaining the overall health and appearance of your peace plant. It helps remove dead or damaged leaves, encourages new growth, and keeps the plant in a desirable shape. Here’s a step-by-step guide on how to prune your peace plant effectively:
Step 1: Gather the necessary tools
Before you begin pruning, make sure you have the right tools on hand. You will need a pair of clean, sharp pruning shears or scissors, rubbing alcohol or hydrogen peroxide for sterilization, and a clean cloth or paper towel.
Step 2: Identify the leaves to prune
Inspect your peace plant and identify any yellow or brown leaves, as well as those that are damaged or wilted. These are the leaves that need to be pruned. It’s important to remove them promptly to prevent the spread of diseases or pests.
Step 3: Sterilize your pruning tools
To prevent the transmission of diseases between plants, it is essential to sterilize your pruning tools before and after each use. Dip your pruning shears or scissors in rubbing alcohol or hydrogen peroxide, and wipe them clean with a cloth or paper towel.
Step 4: Prune the selected leaves
Carefully cut the selected leaves at their base, close to the main stem of the plant. Make sure to cut at a slight angle to prevent water from pooling on the cut surface. Remove all the pruned leaves and dispose of them properly.
Step 5: Monitor and adjust
Observe your peace plant after pruning and monitor its growth. If you notice any new yellow or damaged leaves, repeat the pruning process. Remember to adjust the frequency of pruning based on the plant’s needs and growth rate.
Propagation Techniques for Peace Plants
Propagating peace plants allows you to expand your collection or share them with friends and family. Here are three common methods for propagating peace plants:
1. Division
Division is the most common and straightforward method of propagating peace plants. Follow these steps to successfully divide your peace plant:
– Carefully remove the peace plant from its pot, ensuring you don’t damage the roots.
– Gently separate the plant into two or more sections, ensuring each section has a healthy root system and several leaves.
– Plant each divided section in its own pot filled with well-draining potting soil.
– Water the newly potted divisions thoroughly and place them in a location with bright, indirect light.
– Keep the soil consistently moist but not waterlogged, and within a few weeks, you should see new growth indicating successful propagation.
2. Stem Cuttings
Propagating peace plants through stem cuttings is another effective method. Follow these steps for successful stem cutting propagation:
– Select a healthy, mature stem with several leaves.
– Using clean, sharp pruning shears or scissors, cut a 4-6 inch section of the stem just below a leaf node.
– Remove the lower leaves, leaving only a few at the top.
– Dip the cut end of the stem in rooting hormone powder to promote root development (optional).
– Plant the cutting in a small pot filled with well-draining potting soil or a mixture of peat moss and perlite.
– Place the pot in a warm, humid location with bright, indirect light.
– Mist the cutting regularly to maintain humidity and keep the soil moist but not waterlogged.
– Within a few weeks, roots should start to develop, and new growth will indicate successful propagation.
3. Leaf Cuttings
Leaf cuttings are an alternative method for propagating peace plants. Follow these steps for successful leaf cutting propagation:
– Select a healthy, mature leaf from your peace plant.
– Cut the leaf into sections, ensuring each section has a portion of the main vein.
– Plant the leaf sections in a small pot filled with well-draining potting soil or a mixture of peat moss and perlite.
– Gently press the leaf sections into the soil, ensuring they make good contact.
– Place the pot in a warm, humid location with bright, indirect light.
– Mist the leaf sections regularly to maintain humidity and keep the soil moist but not waterlogged.
– Within a few weeks, new plantlets should start to emerge from the base of the leaf sections, indicating successful propagation.
Conclusion
Pruning and propagation are essential techniques for maintaining and expanding your peace plant collection. By following the step-by-step guide provided, you can confidently prune your peace plant to promote its health and shape. Additionally, the various propagation methods outlined allow you to propagate new plants and share the beauty of peace plants with others. Remember to monitor your plants closely, adjust your pruning routine as needed, and enjoy the rewards of a thriving peace plant collection.
In Summary
The peace plant, also known as Spathiphyllum or peace lily, is a popular houseplant that brings elegance and tranquility to any indoor space. If you’re new to caring for this beautiful plant, don’t worry! In this blog post, we’ll guide you through the basics of peace plant care, so you can keep your plant thriving and looking its best.
One of the great things about peace plants is that they are relatively low-maintenance. They prefer bright, indirect light, so placing them near a window with a sheer curtain is ideal. However, they can tolerate lower light conditions, making them suitable for various areas in your home. When it comes to watering, peace plants are quite forgiving. It’s best to keep the soil slightly moist, but be careful not to overwater as this can lead to root rot. A good rule of thumb is to wait until the top inch of soil feels dry before watering again. Additionally, peace plants appreciate a humid environment, so misting the leaves or placing a tray of water nearby can help maintain the desired moisture level. By following these simple care tips, you’ll be able to enjoy the beauty of your peace plant for years to come!
Here are some questions from our readers:
Q1: How often should I water my peace plant?
A1: Peace plants, also known as Spathiphyllum, prefer to be kept evenly moist but not waterlogged. Water your peace plant when the top inch of soil feels dry to the touch. Generally, watering once a week is sufficient, but it may vary depending on the temperature and humidity levels in your home.
Q2: Can peace plants tolerate low light conditions?
A2: Yes, peace plants are known for their ability to thrive in low light conditions. They can tolerate indirect or filtered light, making them perfect for offices or rooms with limited natural light. However, avoid placing them in direct sunlight, as it can scorch their leaves.
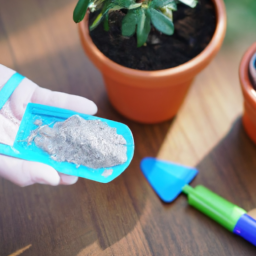
Q3: How do I fertilize my peace plant?
A3: To keep your peace plant healthy, fertilize it every two to four months during the growing season (spring and summer). You can use a balanced houseplant fertilizer diluted to half strength. Apply the fertilizer to damp soil, making sure to avoid getting it on the leaves, and follow the instructions on the fertilizer packaging for proper dosage.
Q4: How do I care for brown leaf tips on my peace plant?
A4: Brown leaf tips on a peace plant are often a sign of low humidity or improper watering. To address this issue, increase the humidity around your plant by placing it on a tray filled with water and pebbles. Additionally, ensure you are watering your peace plant properly, allowing the soil to dry out slightly between waterings.
Q5: Can I propagate my peace plant?
A5: Absolutely! Peace plants are relatively easy to propagate. You can do so by dividing the plant during repotting or by taking stem cuttings. To propagate through stem cuttings, select a healthy stem with several leaves and cut it just below a leaf node. Place the cutting in water or a well-draining potting mix, keeping it moist until roots develop. Once rooted, you can transfer it to a pot with soil.

James Wong is a renowned ethnobotanist, plant scientist, and local television presenter. With a passion for demystifying plant science, he is known for translating complex botanical concepts into practical advice for everyday plant enthusiasts. James’s expertise spans from traditional gardening to cutting-edge plant technologies, making his insights accessible and informative.