Hey there plant lovers! Are you looking for some tips and tricks on how to properly care for your croton plant? Well, you’ve come to the right place! In this blog post, we will delve into the world of croton plants and explore the best practices to ensure their health and vitality. Whether you’re a seasoned plant parent or just starting your journey with these vibrant beauties, we’ve got you covered. So, grab a cup of tea, sit back, and let’s dive into the wonderful world of care for croton plants!

Understanding the Care Requirements for Croton Plants
Introduction
Welcome to this comprehensive guide on caring for croton plants. Whether you are a seasoned gardener or a beginner, understanding the specific care requirements for croton plants is essential to ensure their health and vibrancy. In this article, we will explore the various aspects of croton plant care, including lighting, watering, temperature, soil, and propagation. Let’s dive in!
Lighting
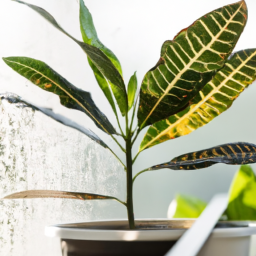
Proper lighting is crucial for the growth and development of croton plants. These tropical beauties thrive in bright, indirect light. Place your croton near a window where it can receive ample sunlight without being exposed to direct sunlight. Direct sunlight can scorch the leaves and cause damage. If you notice the leaves turning brown or yellow, it may be an indication that your croton is receiving too much light.
On the other hand, insufficient light can result in leggy growth and dull foliage. If your croton is not getting enough light, consider using artificial lighting sources, such as fluorescent or grow lights, to supplement its needs. Aim for around 6-8 hours of bright, indirect light per day for optimal growth.
It’s important to note that croton plants are sensitive to changes in lighting conditions. Avoid moving them frequently, as it can cause stress and leaf drop. Once you find a suitable spot with the right lighting, try to keep your croton in that location as much as possible.
Watering
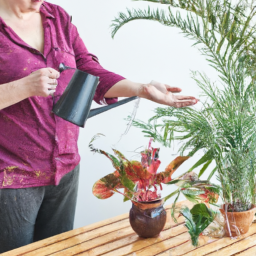
Proper watering is another crucial aspect of croton plant care. These plants prefer a moderately moist soil, but they don’t like to sit in waterlogged conditions. Allow the top inch of the soil to dry out before watering again. Overwatering can lead to root rot and other fungal diseases.
When watering your croton, aim to provide a thorough soak. Water the plant until you see water draining out of the bottom of the pot. This ensures that the entire root ball receives moisture. Discard any excess water from the saucer to prevent waterlogging.
In drier environments or during the summer months, you may need to increase the frequency of watering. However, always check the moisture level of the soil before watering to avoid overwatering. Remember, it’s better to underwater than overwater your croton.
Temperature
Croton plants thrive in warm temperatures, ideally between 60°F (15°C) and 85°F (29°C). They are sensitive to cold drafts and temperatures below 55°F (13°C), which can cause leaf drop and hinder growth. Therefore, it’s important to keep your croton away from drafty windows, doors, and air conditioning vents.
During winter, when indoor heating can dry out the air, consider using a humidifier or placing a tray of water near your croton to increase humidity levels. This will help prevent the leaves from drying out and maintain their vibrant colors.
Soil
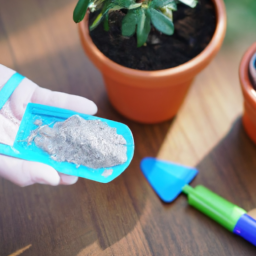
The right soil is essential for the healthy growth of croton plants. They prefer well-draining soil that retains some moisture but doesn’t become waterlogged. A good potting mix for croton plants consists of a blend of peat moss, perlite, and sand. This combination provides adequate drainage while retaining enough moisture for the roots.
It’s important to repot your croton every 1-2 years, preferably during spring. Choose a slightly larger pot with drainage holes to allow for root growth. When repotting, gently loosen the roots and remove any dead or damaged ones. Place the croton in the new pot, fill it with fresh potting mix, and water thoroughly.
If you prefer to use a ready-made potting mix, look for one specifically formulated for tropical plants or foliage plants. These mixes usually contain the necessary ingredients to promote healthy growth in croton plants.
Propagation
Propagating croton plants can be a rewarding experience. The most common method of propagation is through stem cuttings. Here’s a step-by-step guide to help you successfully propagate your croton:
Step 1: Selecting the Cutting
Choose a healthy stem from your existing croton plant. Look for a stem that is at least 4-6 inches long and has several leaves. Make sure to use clean and sharp pruning shears or a knife to avoid damaging the plant.
Step 2: Preparing the Cutting
Remove the lower leaves from the cutting, leaving only a few at the top. This will help prevent excessive moisture loss. If desired, you can dip the cut end of the stem in a rooting hormone to promote faster root development.
Step 3: Rooting the Cutting
Fill a small pot with a well-draining potting mix and make a hole in the center. Insert the cut end of the stem into the hole, ensuring it is planted securely. Lightly press the soil around the stem to provide stability.
Place the potted cutting in a warm and humid environment, such as a greenhouse or a plastic bag. This will create a mini greenhouse effect and promote root growth. Mist the cutting regularly to maintain high humidity levels.
Step 4: Caring for the Cutting
Keep the soil consistently moist but not waterlogged. Avoid direct sunlight, as it can scorch the cutting. After a few weeks, you should start to see new growth, indicating successful root development.
Once the cutting has established roots and grown into a small plant, you can transplant it into a larger pot following the same care guidelines as for mature croton plants.
Conclusion
Caring for croton plants may seem challenging at first, but with the right knowledge and attention, you can enjoy the beauty of these tropical plants in your home or garden. Remember to provide them with bright, indirect light, water them appropriately, maintain suitable temperatures, use well-draining soil, and consider propagating them for more plants. By following these care requirements, you’ll be rewarded with vibrant foliage and a thriving croton plant collection. Happy gardening!
Essential Tips for Watering and Moisture Control for Croton Plants
When it comes to caring for your croton plants, proper watering and moisture control are crucial for their overall health and vitality. These vibrant and tropical plants require specific attention to ensure they thrive in your home or garden. In this guide, we will provide you with essential tips and step-by-step instructions on how to water your croton plants effectively and maintain optimal moisture levels.
Understanding Croton Plant Watering Needs
Before diving into the watering techniques, it’s important to understand the specific watering needs of croton plants. Crotons prefer moist soil, but they are sensitive to overwatering. They thrive in well-draining soil that allows excess water to flow away from the roots. Overwatering can lead to root rot and other diseases, while underwatering can cause the leaves to wilt and drop.
1. Observing the Soil Moisture: The first step in watering your croton plants is to observe the moisture level of the soil. Gently insert your finger about an inch into the soil. If it feels dry, it’s time to water. If it still feels slightly moist, wait for a day or two before watering.
2. Watering Frequency: Croton plants generally require watering once or twice a week, depending on the environmental conditions. However, it’s essential to adjust the frequency based on factors like temperature, humidity, and the size of the plant. During hot summer months, you may need to water more often to prevent the soil from drying out completely.
3. Watering Amount: When watering your croton plant, aim to moisten the soil evenly. Avoid drenching the plant or letting water pool on the surface. It’s crucial to strike a balance between providing enough moisture and preventing waterlogged conditions. As a general rule, water until you see it coming out of the drainage holes at the bottom of the pot.
Proper Watering Techniques for Croton Plants
Now that you understand the watering needs of croton plants, let’s delve into the proper techniques to ensure their optimal growth and health.
1. Watering Method: The best way to water your croton plant is by using the bottom-up watering method. Place the pot in a tray or saucer filled with water and allow the plant to soak up the moisture through the drainage holes. This method ensures thorough watering while preventing excess water from sitting in the pot.
2. Water Quality: Croton plants are sensitive to chemicals such as chlorine and fluoride found in tap water. To avoid any adverse effects, it’s recommended to use filtered or distilled water. Alternatively, you can leave tap water in an open container for 24 hours before using it, allowing chlorine to dissipate.
3. Humidity: Croton plants thrive in humid environments, so it’s beneficial to increase humidity levels around them. You can achieve this by misting the leaves regularly with water or placing a humidifier nearby. Additionally, grouping your croton plants together can create a microclimate with higher humidity levels.
4. Seasonal Adjustments: As the seasons change, so do the watering requirements of your croton plants. During the winter months, when the air is drier, you may need to reduce the watering frequency. Conversely, in the summer, when the air is more humid, you may need to increase the frequency to compensate for faster evaporation.
Moisture Control for Croton Plants
Aside from proper watering techniques, maintaining optimal moisture levels in the surrounding environment is equally important for the health of your croton plants. Here are some tips to help you control moisture effectively:
1. Avoid Overcrowding: Overcrowding your croton plants can hinder proper air circulation, leading to increased humidity and potential fungal issues. Provide enough space between plants to allow for good airflow.
2. Use Well-Draining Soil: Crotons thrive in well-draining soil that allows excess water to flow freely. Choose a quality potting mix that provides good drainage while retaining enough moisture for the plants.
3. Monitor Temperature and Light: Temperature and light conditions can affect moisture levels in the soil. Keep your croton plants away from cold drafts or direct heat sources, as extreme temperatures can cause the soil to dry out quickly. Additionally, ensure your plants receive adequate but indirect sunlight to maintain optimal moisture levels.
4. Regularly Check for Pests and Diseases: Pests and diseases can weaken your croton plants, making them more susceptible to moisture-related issues. Inspect your plants regularly for any signs of infestation or disease, and take appropriate measures to control and prevent them.
By following these essential tips for watering and moisture control, you can ensure that your croton plants thrive and display their stunning foliage. Remember to observe the moisture levels, adjust watering frequency based on environmental conditions, and provide adequate humidity. With proper care, your croton plants will flourish and add a touch of tropical beauty to your home or garden.
Pruning and Maintenance Techniques for Healthy Croton Plants
Introduction
Welcome to our comprehensive guide on pruning and maintenance techniques for healthy croton plants. Crotons, scientifically known as Codiaeum variegatum, are popular houseplants known for their vibrant and colorful foliage. Proper care, including regular pruning and maintenance, is essential to ensure the health and longevity of these beautiful plants. In this guide, we will provide you with step-by-step instructions on how to prune and maintain your croton plant to keep it thriving and looking its best.
Why Prune Croton Plants?
Pruning plays a crucial role in maintaining the health and appearance of croton plants. Here are a few reasons why pruning is important:
- Shape and Size Control: Pruning helps control the shape and size of the plant, preventing it from becoming leggy or overgrown. It allows you to maintain a compact and bushy appearance.
- Promotes New Growth: Pruning stimulates new growth by removing dead or damaged leaves, encouraging the plant to produce fresh foliage.
- Enhances Air Circulation: Proper pruning improves air circulation within the plant, reducing the risk of fungal diseases and pest infestations.
Step-by-Step Guide to Pruning and Maintenance
1. Tools and Materials
Before you begin pruning your croton plant, gather the necessary tools and materials:
- Sharp pruning shears
- Gloves to protect your hands
- Clean cloth or paper towel
- Isopropyl alcohol or disinfectant spray
Having these items ready will make the pruning process easier and more efficient.
2. Choose the Right Time
Pruning is best done during the active growing season, which is typically spring or early summer. Avoid pruning during winter or when the plant is stressed, as it may impede its ability to recover.
3. Assess the Plant
Before you start pruning, carefully examine your croton plant to identify the areas that require attention. Look for dead, damaged, or diseased leaves, as well as any branches that are crossing or rubbing against each other.
Once you have identified the areas to prune, you can proceed with the following pruning techniques:
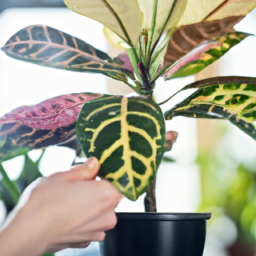
4. Removing Dead or Damaged Leaves
Start by removing any dead or damaged leaves. These leaves not only detract from the plant’s appearance but can also attract pests and diseases. Use your pruning shears to make clean cuts as close to the base of the leaf stem as possible. Wipe the blades of your shears with a clean cloth or paper towel soaked in isopropyl alcohol or disinfectant spray to prevent the spread of any potential diseases.
Remember, it’s normal for the lower leaves of a croton plant to turn yellow and drop off naturally as the plant grows. Focus on removing leaves that are completely dead or severely damaged.
5. Thinning Out Overcrowded Areas
If you notice overcrowded areas with multiple branches or foliage, it’s essential to thin them out. This helps improve air circulation and allows light to reach all parts of the plant, promoting healthy growth.
Identify the branches or foliage that are too close together and carefully remove them using your pruning shears. Make clean cuts just above a leaf node or bud to encourage new growth.
6. Shaping and Controlling Size
To maintain a desirable shape and size for your croton plant, it’s important to prune selectively. Remove any branches or stems that are growing too long or out of proportion. Aim to create a balanced and visually appealing plant.
When pruning for shape, make your cuts just above a leaf node or bud, preferably at a slight angle. This encourages new growth and prevents the plant from looking stubby or uneven.
7. Aftercare and Maintenance
After pruning, it’s crucial to provide proper aftercare and ongoing maintenance to ensure the health of your croton plant. Here are a few key tips:
- Watering: Crotons prefer moist but well-draining soil. Water your plant when the top inch of soil feels dry, and avoid overwatering, as it can lead to root rot.
- Light: Place your croton plant in a bright location with indirect sunlight. Avoid exposing it to direct sunlight, as it can scorch the leaves.
- Temperature and Humidity: Crotons thrive in warm temperatures between 60°F and 85°F (15°C to 29°C) and high humidity. Mist the plant regularly or place it on a tray filled with pebbles and water to increase humidity.
- Fertilizing: Feed your croton plant with a balanced, water-soluble fertilizer every two to three months during the growing season. Follow the instructions on the fertilizer packaging for the correct dosage.
By following these aftercare and maintenance practices, your croton plant will continue to flourish and showcase its stunning foliage.
Conclusion
Pruning and maintenance are essential for the health and beauty of croton plants. Regularly removing dead or damaged leaves, thinning out overcrowded areas, and shaping the plant will promote healthy growth and vibrant foliage. Remember to provide proper aftercare and ongoing maintenance, including watering, light, temperature, humidity, and fertilizing. With these step-by-step techniques and tips, you can confidently care for your croton plant and enjoy its captivating presence in your home or garden.
Key Takeaways of this article
Croton plants are known for their vibrant and colorful foliage, making them a popular choice for indoor and outdoor decoration. However, caring for these beautiful plants can sometimes be a bit challenging. To ensure your croton plant thrives and remains healthy, there are a few key factors to consider.
Firstly, crotons require a warm and humid environment to flourish. Placing them in a location with bright, indirect sunlight is ideal. Additionally, it’s crucial to keep the soil consistently moist, but not overly saturated, as overwatering can lead to root rot. Regularly misting the leaves can also help maintain the required humidity levels. Moreover, croton plants benefit from regular fertilization during their active growth period, typically spring and summer. Using a balanced, water-soluble fertilizer will provide the necessary nutrients for vibrant foliage. Lastly, be mindful of pests such as mealybugs and spider mites, which can infest croton plants. Regularly inspecting the leaves and treating any signs of infestation promptly will help keep your croton plant healthy and pest-free. By following these care tips, you can enjoy the stunning beauty of your croton plant for years to come.
Your Burning Questions Answered:
Q1: How often should I water my croton plant?
A1: Croton plants prefer to be kept evenly moist, but not overly saturated. It is recommended to water your croton plant when the top inch of soil feels dry to the touch. Depending on the temperature and humidity, this may be once or twice a week. However, it’s important to avoid letting the soil completely dry out or sitting in water for extended periods.
Q2: What is the best location for my croton plant?
A2: Croton plants thrive in bright, indirect light. Place your croton plant near a window with filtered sunlight or in a well-lit room. Avoid exposing it to direct sunlight, as it can scorch the leaves. Additionally, croton plants prefer a warm environment with temperatures between 60-85°F (15-29°C).
Q3: How do I fertilize my croton plant?
A3: To keep your croton plant healthy and vibrant, it’s recommended to fertilize it every two to four weeks during the growing season (spring and summer). Use a balanced, water-soluble fertilizer and dilute it to half the recommended strength. Apply the fertilizer to the soil, avoiding direct contact with the leaves. During the dormant season, reduce fertilization to once every two months.
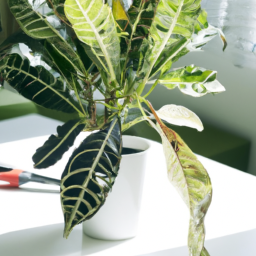
Q4: How do I prevent my croton plant from dropping leaves?
A4: Dropping leaves can be a common issue with croton plants, often due to changes in environment or care. To prevent leaf drop, ensure your croton plant is in a suitable location with consistent light and temperature. Avoid placing it near drafts or sudden temperature changes. Additionally, maintain proper watering by keeping the soil consistently moist, but not soggy. Regularly misting the leaves can also help increase humidity and prevent leaf drop.
Q5: How do I propagate my croton plant?
A5: Croton plants can be propagated through stem cuttings. Select a healthy stem with several leaves, and make a clean cut just below a leaf node. Remove the lower leaves, leaving only a few at the top. Place the cutting in a container with moistened potting mix or water, ensuring the node is submerged. Keep the cutting in a warm, humid environment, and roots should develop within a few weeks. Once rooted, transfer the cutting to a pot with well-draining soil and care for it as you would a mature croton plant.

James Wong is a renowned ethnobotanist, plant scientist, and local television presenter. With a passion for demystifying plant science, he is known for translating complex botanical concepts into practical advice for everyday plant enthusiasts. James’s expertise spans from traditional gardening to cutting-edge plant technologies, making his insights accessible and informative.