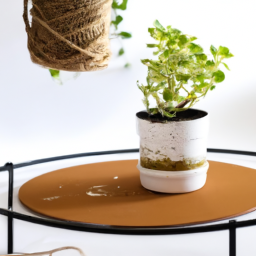
Are your houseplants looking a little lackluster lately? It might be time to give them a fresh start! Welcome to our plant repotting guide: refresh your green friends. Repotting is a simple yet crucial task that can breathe new life into your plants, promoting healthier growth and vibrant foliage. Whether you’re a seasoned plant parent or just starting out, this guide will provide you with all the information you need to successfully repot your beloved green companions. So, grab your gardening gloves and let’s dive into the wonderful world of plant repotting!

The Importance of Repotting Plants: Why and When Should You Repot?
Introduction
Plants are not just beautiful additions to our homes and gardens; they are living organisms that require proper care and attention to thrive. One essential aspect of plant care is repotting. Repotting refers to the process of transferring a plant from one container to another, providing it with fresh soil and adequate space for growth. In this guide, we will explore the importance of repotting plants and discuss when and why you should consider repotting your green friends.
Why is Repotting Important?
Repotting plays a crucial role in maintaining the health and vitality of your plants. Over time, plants outgrow their containers, depleting the available nutrients in the soil and becoming root-bound. Repotting allows you to rejuvenate your plants by providing them with fresh, nutrient-rich soil and a larger space to expand their root system.
Additionally, repotting helps prevent the accumulation of harmful salts and mineral deposits in the soil. These deposits can build up over time, leading to nutrient deficiencies and hindered growth. By repotting, you can remove these deposits and ensure that your plants have access to the essential minerals they need.
Furthermore, repotting presents an opportunity to inspect your plants’ roots for any signs of disease or pest infestation. By carefully examining the roots, you can identify and address any issues before they spread to the rest of the plant.
When Should You Repot?
Knowing when to repot your plants is essential to ensure their well-being. Here are some signs that indicate it’s time to repot:
1. Root Bound Plants
If you notice roots circling around the bottom of the pot or emerging from the drainage holes, it is a clear indication that your plant has become root-bound. Root-bound plants have limited access to nutrients and water, leading to stunted growth. Repotting will provide them with the necessary space to develop a healthy root system.
When repotting root-bound plants, gently loosen the roots and trim any excessively long or damaged ones. This encourages the growth of new roots and ensures better nutrient absorption.
2. Slow Growth or Yellowing Leaves
If your plant’s growth has significantly slowed down, or you notice yellowing leaves despite proper care, it may be a sign that the current pot can no longer support the plant’s needs. Repotting will help provide fresh soil with ample nutrients, allowing the plant to regain its vigor and vitality.
Before repotting, examine the roots for any signs of rot or disease. Trim off any affected areas and treat the plant accordingly to prevent further damage.
3. Overwatering or Poor Drainage
If you frequently find yourself dealing with overwatered plants or notice poor drainage in the current pot, it’s time to consider repotting. Overwatering can lead to root rot and other fungal diseases, while poor drainage can suffocate the roots by depriving them of oxygen.
When repotting, choose a container with adequate drainage holes and use well-draining soil to ensure proper moisture levels. This will prevent waterlogged roots and promote healthy growth.
Conclusion
Repotting your plants is a vital aspect of their care, ensuring their continued growth and well-being. By providing fresh soil, ample space, and addressing any root-related issues, you can refresh your green friends and help them thrive. Remember to observe the signs indicating the need for repotting, and follow the step-by-step guide provided in this article to ensure a successful repotting process.
Step-by-Step Guide to Repotting Houseplants: Tools, Techniques, and Tips
Are your houseplants outgrowing their pots? It might be time to repot them and give them a fresh start. Repotting is an essential part of plant care that helps promote healthy growth and prevents root-bound plants. In this step-by-step guide, we will walk you through the tools, techniques, and tips to successfully repot your green friends.
Gather the Essential Tools
Before you begin repotting, make sure you have the necessary tools at hand:
- A new pot: Choose a pot that is one size larger than the current one, with drainage holes at the bottom.
- Potting mix: Opt for a well-draining mix suitable for your specific plant type.
- Trowel or garden spade: These tools will help you remove the plant from its current pot.
- Pruning shears: Use these to trim any damaged or overgrown roots.
- Watering can: You’ll need this to water your plant after repotting.
Prepare the Plant and Pot
Now that you have your tools ready, follow these steps to prepare your plant and pot:
1. Water your plant: Before repotting, thoroughly water your plant to ensure it is well-hydrated. This will make it easier to remove the plant from its current pot.
2. Select a new pot: Choose a pot that has drainage holes at the bottom to prevent waterlogging. The new pot should be one size larger than the current one to allow room for growth.
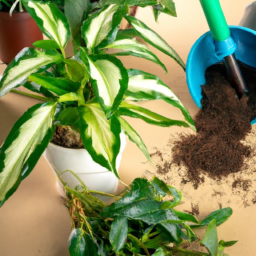
3. Prepare the pot: Fill the new pot with fresh potting mix, leaving enough space at the top for the plant to sit comfortably. Gently press down the soil to remove any air pockets.
Repotting Techniques
Now it’s time to repot your plant. Follow these techniques for a successful repotting process:
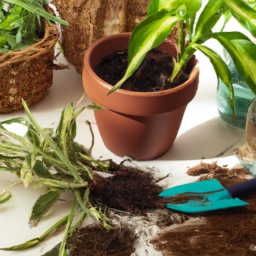
1. Remove the plant from its current pot: Carefully turn the pot upside down while supporting the plant’s stem with your hand. Tap the bottom of the pot or gently squeeze the sides to loosen the root ball. Once loose, gently slide the plant out of the pot.
2. Inspect the roots: Take a close look at the plant’s roots. If they are circling around the root ball or appear crowded, it’s time to trim them. Use pruning shears to remove any damaged or excessively long roots. This will encourage new root growth.
3. Place the plant in the new pot: Position the plant in the center of the new pot, ensuring it sits at the same depth as before. Add more potting mix around the sides, gently pressing it down to secure the plant in place. Leave a small gap between the soil surface and the rim of the pot for watering.
4. Water the plant: After repotting, give your plant a good drink of water. This will help settle the soil and hydrate the roots. Be careful not to overwater, as this can lead to root rot. Allow the excess water to drain out through the pot’s drainage holes.
Post-Repotting Care and Tips
Once you have successfully repotted your plant, follow these care tips to ensure its well-being:
1. Find the right spot: Place your repotted plant in an area that suits its light requirements. Different plants have varying light preferences, so make sure to research your specific plant’s needs.
2. Avoid direct sunlight: While some plants thrive in direct sunlight, most prefer bright, indirect light. Avoid placing your repotted plant in harsh, direct sunlight, as it can scorch the leaves.
3. Monitor watering needs: After repotting, your plant may require adjustments in its watering schedule. Check the moisture level of the soil regularly and water only when the top inch feels dry. Overwatering can lead to root rot, so it’s essential to strike a balance.
4. Provide occasional fertilization: Once your plant has settled into its new pot, you can start fertilizing it. Use a balanced, water-soluble fertilizer according to the package instructions. Fertilize your plant every 4-6 weeks during the growing season.
5. Observe for signs of stress: After repotting, your plant may experience some temporary stress as it adjusts to its new environment. Keep an eye out for wilting, yellowing leaves, or stunted growth. These signs may indicate that your plant needs additional care or adjustment.
By following this step-by-step guide, you can confidently repot your houseplants and give them the refresh they deserve. Remember to gather the necessary tools, prepare your plant and pot, employ effective repotting techniques, and provide post-repotting care. Your green friends will thank you with vibrant growth and a revitalized appearance!
Common Mistakes to Avoid When Repotting Plants: Troubleshooting and Solutions
Introduction
Repotting plants is an essential task that every plant parent needs to master. It not only provides your green friends with fresh soil and more space to grow but also helps prevent root-bound issues. However, like any gardening endeavor, repotting can go wrong if not done correctly. In this guide, we will discuss some common mistakes to avoid when repotting plants and provide you with troubleshooting tips and solutions to ensure your plants thrive in their new homes.
1. Using the Wrong Pot Size
One of the most common mistakes when repotting plants is selecting the wrong pot size. Many plant enthusiasts tend to choose pots that are too large for their plants, thinking it will allow for more growth. However, an oversized pot can lead to waterlogging, as the excess soil retains moisture for longer periods, increasing the risk of root rot.
On the other hand, using a pot that is too small can restrict root growth and cause the plant to become root-bound. This can lead to stunted growth and nutrient deficiencies. To avoid these issues, it is crucial to select a pot that is only one or two sizes larger than the current one. This will provide enough space for the roots to grow without overwhelming them.
2. Neglecting Proper Drainage
Proper drainage is essential for the health of your plants. When repotting, it is crucial to ensure that the new pot has adequate drainage holes. Without proper drainage, excess water can accumulate in the soil, leading to root rot and other moisture-related problems.
To enhance drainage, you can add a layer of small rocks or pebbles at the bottom of the pot before adding the soil. This layer helps prevent the drainage holes from getting clogged and allows water to flow freely through the soil.
3. Using Incorrect Soil or Potting Mix
Choosing the right soil or potting mix is vital for the overall well-being of your plants. Using garden soil alone is not recommended for potted plants, as it tends to be heavy and may not provide the necessary nutrients and aeration. Instead, opt for a well-draining potting mix that is specifically formulated for indoor or container plants.
Avoid using soil that is too compact or clay-like, as it can lead to poor drainage and suffocate the roots. Additionally, steer clear of potting mixes that contain excessive amounts of organic matter, as they can retain too much moisture and cause root rot. Always check the ingredients and choose a potting mix that suits the needs of your plants.
4. Disturbing the Roots Too Much
When repotting, it is essential to handle the plant’s roots with care. Excessive disturbance or rough handling can damage the delicate root system and hinder the plant’s ability to establish in its new pot. Avoid pulling or tearing the roots apart unless they are severely root-bound and need some gentle separation.
If the roots are tightly wound around the root ball, gently tease them apart with your fingers or a tool. Be patient and take your time to ensure minimal damage. Trim any excessively long or damaged roots before placing the plant in its new pot.
5. Overwatering or Underwatering
Watering is a critical aspect of plant care, and it becomes even more crucial after repotting. However, many plant owners make the mistake of either overwatering or underwatering their plants during this period.
Overwatering can suffocate the roots and lead to root rot, while underwatering can cause dehydration and nutrient deficiencies. It is essential to strike a balance and provide your plants with the right amount of water. Monitor the moisture level in the soil regularly and adjust your watering schedule accordingly.
Conclusion
Avoiding these common mistakes when repotting your plants will greatly increase their chances of thriving in their new homes. Remember to choose the right pot size, ensure proper drainage, use the correct soil or potting mix, handle the roots with care, and water appropriately. By following these troubleshooting tips and solutions, you’ll be able to refresh your green friends successfully and enjoy their beauty and vitality for years to come. Happy repotting!
Summary Snapshot
Are your houseplants looking a little sad and cramped in their pots? It might be time to give them a fresh start with a repotting session. Repotting your plants not only gives them more room to grow, but it also allows you to refresh their soil and remove any root-bound issues. In this plant repotting guide, we’ll walk you through the steps to successfully repot your green friends and give them the love they deserve.
First, choose a new pot that is slightly larger than the current one. Make sure it has drainage holes to prevent waterlogging. Gently remove the plant from its current pot, being careful not to damage the roots. If the roots are tightly packed, you can gently loosen them with your fingers or a fork. Next, add a layer of fresh potting soil to the new pot and place the plant in the center. Fill the remaining space with soil, leaving some room at the top for watering. Finally, give your plant a good drink of water and place it in a suitable spot with the right amount of light. With a little bit of care and attention, your green friends will thrive in their new homes and bring a fresh burst of life to your space.
FAQ Roundup:
Q1: When should I repot my plants?
A1: It’s generally recommended to repot your plants when you notice the roots becoming overcrowded or when the plant has outgrown its current pot. Signs that your plant needs repotting include roots growing out of the drainage holes, slow growth, or the pot tipping over easily due to top-heavy foliage.
Q2: What supplies do I need for repotting my plants?
A2: To successfully repot your plants, you’ll need a few supplies. These include a new pot that is slightly larger than the current one, fresh potting soil, a trowel or small shovel for scooping soil, and a watering can or spray bottle to water the plant after repotting.
Q3: How do I repot my plants without damaging them?
A3: To repot your plants without causing damage, start by gently removing the plant from its current pot. Gently loosen the roots and remove any excess soil. Place the plant in the new pot, ensuring it sits at the same depth as before. Fill the remaining space with fresh potting soil, pressing it lightly to remove air pockets. Finally, water the plant thoroughly to help settle the soil.
Q4: How often should I repot my plants?
A4: The frequency of repotting varies depending on the plant species and its growth rate. As a general guideline, most indoor plants benefit from being repotted every 1-2 years. However, some slower-growing plants may only require repotting every 3-5 years, while faster-growing plants may need to be repotted annually. Monitor your plants’ growth and root health to determine when they need repotting.
Q5: Can I repot my plants at any time of the year?
A5: While you can repot your plants at any time of the year, it’s generally best to do so during the spring or early summer when plants are actively growing. This allows them to recover and establish new roots more easily. However, if your plant is showing signs of distress or root-bound conditions, it’s better to repot it immediately, regardless of the season.

Lisa Chen is a seasoned indoor gardening expert and the author of several bestselling books on the topic. With a background in horticulture and urban farming, Lisa is dedicated to helping urban dwellers embrace the joys of cultivating green spaces indoors. Her detailed guides and hands-on tips empower readers to transform their living spaces into thriving plant sanctuaries.