Are you looking to add a touch of greenery to your home but don’t want to spend a fortune on fancy planters and stands? Look no further! In this blog post, we will explore the wonderful world of DIY planters and plant stand projects. Whether you have a green thumb or are just starting your gardening journey, these creative and budget-friendly ideas will surely inspire you to create your own unique plant displays. So, grab your tools and let’s dive into the world of DIY planters and plant stand projects!
Creative DIY Planters: Transforming Everyday Objects into Stylish Plant Holders
Gardening enthusiasts often find joy in not only nurturing their plants but also in finding creative ways to display them. DIY planters and plant stands are a fantastic way to add a personal touch to your indoor or outdoor space. By repurposing everyday objects, you can transform them into stylish and unique plant holders. In this article, we will guide you through some exciting DIY planter and plant stand projects that are sure to inspire your green thumb.
1. Vintage Suitcase Planter
Give an old vintage suitcase a new lease on life by turning it into a charming planter. Start by cleaning the suitcase thoroughly and lining it with a plastic sheet to prevent water damage. Fill the bottom with gravel for drainage and add potting soil. You can choose to plant a variety of flowers or herbs, depending on your preference. The suitcase planter can be placed on a table or hung on a wall for a unique display.
If you want to take it a step further, consider adding legs to your vintage suitcase planter. Attach wooden or metal legs to the bottom corners of the suitcase using screws or adhesive. This will elevate the planter, giving it a more prominent presence in your space.
Remember to water your plants regularly and ensure that the suitcase planter is placed in an area with adequate sunlight. With a little care, your vintage suitcase planter will become a conversation starter in your home or garden.
2. Upcycled Tin Can Planters
Tin cans are versatile objects that can be easily transformed into adorable planters. Start by cleaning and removing any labels from the cans. You can paint the cans in your desired color or leave them as is for a rustic look. Using a hammer and nail, create drainage holes in the bottom of the cans to prevent waterlogging.
Fill the cans with potting soil and plant your favorite flowers or herbs. You can group multiple tin can planters together for a visually appealing arrangement. Hang them on a wall using hooks or place them on a windowsill or shelf.
To add a touch of personalization, consider decorating the tin cans with ribbons, twine, or paint. You can also label each planter with the name of the plant using small wooden stakes or painted rocks. These upcycled tin can planters are not only budget-friendly but also eco-friendly, as they give a second life to materials that would otherwise be discarded.
3. Wooden Ladder Plant Stand
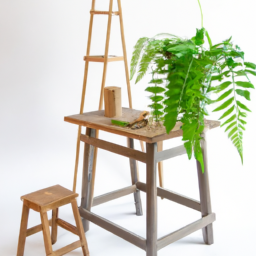
A wooden ladder can be transformed into a stunning plant stand, adding height and dimension to your plant display. Start by sanding the ladder to remove any rough edges and splinters. Apply a coat of paint or varnish to protect the wood from moisture and give it a polished look.
Decide how many shelves you want on your ladder plant stand. Measure and mark the desired height for each shelf, ensuring that they are evenly spaced. Attach wooden planks or boards horizontally between the ladder rungs using screws or nails. These shelves will serve as platforms for your plants.
Once the shelves are securely attached, fill them with potting soil and arrange your potted plants. You can mix and match different plant varieties to create an eye-catching display. Place the ladder plant stand against a wall or in a corner, allowing it to become a focal point in your garden or living space.
Remember to water your plants regularly and ensure that the ladder plant stand is stable and secure. You can also add additional decorative elements such as fairy lights or hanging baskets to enhance the overall look.
These are just a few examples of the countless DIY planter and plant stand projects you can undertake. Let your creativity soar as you explore different materials and objects to repurpose into unique plant holders. Not only will you add a personal touch to your space, but you will also contribute to a more sustainable and eco-friendly lifestyle.

Building Your Own Plant Stand: Easy and Affordable DIY Projects for Displaying Your Greenery
Welcome to the world of DIY planters and plant stand projects! If you’re looking to add a touch of greenery to your home or garden, building your own plant stand is a fantastic way to showcase your favorite plants and flowers. Not only does it allow you to exercise your creativity, but it also provides a cost-effective solution to displaying your greenery. In this guide, we’ll explore some easy and affordable DIY projects that will help you create beautiful plant stands to elevate your plant collection.
Choosing the Right Materials
Before diving into the construction process, it’s important to select the right materials for your plant stand. The choice of materials will depend on your personal preferences, budget, and the overall aesthetic you want to achieve. Here are a few popular options:
1. Wood: Wood is a versatile and readily available material that can be easily customized to fit your desired design. Cedar and redwood are excellent choices for outdoor plant stands as they are naturally resistant to decay and insects. For indoor plant stands, you can consider using pine, oak, or even reclaimed wood for a rustic look.
2. Metal: Metal plant stands offer a sleek and modern appearance. Aluminum and wrought iron are commonly used due to their durability and resistance to rust. You can find metal plant stand frames in various designs and finishes, or even repurpose old metal furniture to create a unique stand.
3. Concrete: If you’re aiming for a minimalist and industrial look, concrete plant stands are an excellent choice. You can either purchase precast concrete blocks or create your own molds using plywood. Concrete stands are sturdy and can withstand harsh weather conditions, making them suitable for both indoor and outdoor use.
Designing Your Plant Stand
Once you’ve chosen your materials, it’s time to design your plant stand. Consider the size and weight of your plants, as well as the available space in your home or garden. Here are a few design ideas to get you started:
1. Multi-tiered Stand: Create a visually appealing display by building a multi-tiered plant stand. This design allows you to showcase plants of different heights and sizes, adding depth and dimension to your space. You can use wooden planks or metal shelves to create the tiers, ensuring they are securely attached for stability.
2. Hanging Stand: If you have limited floor space, a hanging plant stand is a perfect solution. This design involves suspending your plants from the ceiling or wall using ropes, chains, or macramé hangers. Consider using sturdy hooks or brackets to ensure the safety of your plants.
3. Repurposed Furniture: Give new life to old furniture pieces by transforming them into plant stands. An old ladder, wooden crates, or even a vintage chair can be repurposed to create a unique and charming stand. Sand, paint, or stain the furniture to match your desired aesthetic.
Building Your Plant Stand
Now that you have your materials and design in mind, it’s time to start building your plant stand. Follow these steps to bring your DIY project to life:
1. Measure and Cut: Measure and mark the dimensions of your plant stand components on the chosen material. Use a saw or appropriate cutting tool to carefully cut the pieces according to your measurements. Remember to wear safety goggles and gloves while cutting.
2. Assemble the Frame: If you’re using wood or metal, assemble the frame of your plant stand by attaching the cut components together. Use screws, nails, or brackets to secure the joints. Ensure the frame is sturdy and level by using a carpenter’s square or level.
3. Add Shelves or Platforms: If you’re creating a multi-tiered stand, attach the shelves or platforms to the frame at the desired heights. Ensure they are level and securely fastened to prevent accidents. For hanging stands, attach the necessary hooks or brackets to the frame.
4. Finish and Protect: Sand the surfaces of your plant stand to create a smooth finish. Apply a coat of paint, stain, or sealant to protect the material from moisture and UV rays. This step is crucial for outdoor plant stands to ensure their longevity.
5. Place Your Plants: Once your plant stand is fully constructed and dry, it’s time to arrange your plants. Consider the lighting and watering needs of each plant, ensuring they are placed in suitable positions to thrive. Add decorative elements such as pebbles, moss, or fairy lights to enhance the overall aesthetic.
With these easy and affordable DIY projects, you can proudly display your greenery in beautifully crafted plant stands. Remember to regularly maintain and care for your plants to ensure their health and longevity. Happy gardening!

Upcycling Materials for Unique Planters: DIY Ideas to Give New Life to Old Items
Are you looking for creative ways to display your plants while also reducing waste and giving new life to old items? Upcycling materials for unique planters is a fantastic solution! Not only does it allow you to express your creativity, but it also adds a touch of uniqueness to your indoor or outdoor space. In this guide, we will explore some DIY ideas to help you transform old items into stunning planters.
1. Vintage Suitcase Planter
If you have an old vintage suitcase lying around, don’t let it gather dust in the attic. Instead, repurpose it into a charming planter that adds a nostalgic touch to your garden or patio. Here’s how you can do it:
First, clean the suitcase thoroughly, both inside and outside, to remove any dirt or debris. Next, line the inside of the suitcase with a plastic sheet or garbage bag to prevent water from leaking through. Make sure to poke a few drainage holes in the bottom to ensure proper water flow.
Now, it’s time to add soil and plants. Choose plants that thrive in containers, such as succulents or herbs. Fill the suitcase with potting mix, leaving enough space for the plants to grow. Arrange the plants according to your preference, considering their height and color. Finally, water the plants gently and place the suitcase planter in a suitable location with adequate sunlight.
Your vintage suitcase planter is now ready to add a touch of nostalgia and greenery to your space!
2. Repurposed Mason Jar Planters
Mason jars are incredibly versatile and can be transformed into adorable planters with just a few simple steps. Here’s how you can repurpose mason jars into unique planters:
Start by cleaning the mason jars and removing any labels or sticky residue. You can use warm soapy water or a mixture of vinegar and water for this purpose. Once the jars are clean and dry, you can paint them in your desired color or leave them clear for a more rustic look.
Next, add a layer of small rocks or pebbles at the bottom of the jar to improve drainage. Then, fill the jar with potting soil, leaving enough space for the plant’s roots. Choose small plants or herbs that fit well in the jar and have similar water and light requirements.
After planting, water the plants gently and place the mason jar planters near a window or in a well-lit area. Remember to monitor the moisture levels and water accordingly.
These repurposed mason jar planters not only look charming but also make great gifts for friends and family.
3. Tire Plant Stand
Do you have an old tire lying around? Don’t throw it away! Instead, turn it into a unique plant stand that adds an industrial touch to your garden. Here’s how:
Start by cleaning the tire thoroughly to remove any dirt or debris. You can use soap and water or a pressure washer for this step. Once the tire is clean and dry, you can paint it in a color that complements your outdoor space.
Next, choose a wooden or metal plank that fits securely within the tire’s inner circumference. This will serve as the base for your plant stand. Attach the plank to the tire using screws or strong adhesive.
Now, it’s time to add the plants. Place potted plants of various sizes and colors on the wooden or metal plank. Consider using plants with cascading foliage to create a visually appealing display.
Water the plants as needed and place the tire plant stand in a suitable location, ensuring it is stable and won’t tip over.
Your upcycled tire plant stand is now ready to showcase your favorite plants in a unique and eye-catching way!
In conclusion, upcycling materials for unique planters not only allows you to repurpose old items but also adds a personal touch to your indoor or outdoor space. Whether it’s transforming a vintage suitcase, repurposing mason jars, or creating a tire plant stand, these DIY ideas are sure to breathe new life into your old items while showcasing your creativity and love for plants. So, gather your materials, roll up your sleeves, and get ready to embark on an exciting upcycling journey!
In Summary
If you’re looking to add some greenery to your living space but don’t want to spend a fortune on expensive planters and stands, then DIY projects are the way to go! Not only are they budget-friendly, but they also allow you to unleash your creativity and customize your planters and stands to match your personal style.
One popular DIY project is making planters out of everyday items like mason jars, tin cans, or even old shoes! With a bit of paint and some creativity, you can transform these ordinary objects into unique and eye-catching planters. Another idea is to repurpose old furniture, such as wooden crates or drawers, into plant stands. Not only will this give your plants a stylish place to thrive, but it will also give new life to unused items lying around your home. So, gather your supplies and get ready to embark on a fun and rewarding DIY journey that will bring both beauty and greenery into your home!
Check Out These FAQs:
Q1: What are some easy DIY planter projects for beginners?
A1: If you’re new to DIY planters, there are plenty of simple projects you can try. A popular option is creating a hanging planter using a macrame technique, which involves knotting ropes or cords to create a unique design. Another beginner-friendly idea is repurposing old mason jars or tin cans as planters by adding drainage holes and a coat of paint. These projects require minimal tools and materials, making them perfect for those just starting out.
Q2: How can I make a stylish plant stand on a budget?
A2: Creating a stylish plant stand doesn’t have to break the bank. One budget-friendly option is using cinder blocks and wooden boards to build a simple and modern plant stand. By stacking the cinder blocks and placing the boards on top, you can easily customize the height and number of shelves. Another affordable idea is repurposing a ladder or wooden pallet to create a multi-level plant stand. With a little creativity and some basic tools, you can achieve an eye-catching plant display without spending a fortune.
Q3: What materials can I use to make unique DIY planters?
A3: When it comes to making unique DIY planters, the possibilities are endless. You can get creative with materials such as old tires, wine barrels, or even recycled plastic bottles. For a rustic look, consider using reclaimed wood or repurposing vintage containers like teapots or watering cans. If you’re feeling adventurous, try making planters out of concrete, terracotta pots, or even fabric. Don’t be afraid to experiment and think outside the box – the more unique the material, the more distinctive your planters will be.
Q4: Are there any DIY planter projects suitable for small spaces?
A4: Absolutely! If you have limited space, there are still plenty of DIY planter projects that can add greenery to your surroundings. One idea is creating a vertical herb garden using a wooden pallet or hanging shoe organizer. These vertical planters allow you to maximize your space by growing herbs or small plants vertically instead of horizontally. Another option is repurposing old drawers or wooden crates as planters and stacking them to create a tiered garden. These projects are perfect for balconies, small patios, or even indoor spaces.
Q5: How can I ensure my DIY planters have proper drainage?
A5: Proper drainage is crucial for the health of your plants. To ensure your DIY planters have good drainage, you can follow a few simple steps. First, make sure to drill or poke drainage holes in the bottom of your containers using a drill or a sharp tool. This will allow excess water to escape and prevent root rot. Additionally, consider adding a layer of small rocks or pebbles at the bottom of the planter before adding soil. This will create a reservoir for excess water and help prevent waterlogged roots. By taking these precautions, you’ll provide your plants with the proper drainage they need to thrive.

Lisa Chen is a seasoned indoor gardening expert and the author of several bestselling books on the topic. With a background in horticulture and urban farming, Lisa is dedicated to helping urban dwellers embrace the joys of cultivating green spaces indoors. Her detailed guides and hands-on tips empower readers to transform their living spaces into thriving plant sanctuaries.


