Are you looking for unique and eco-friendly ways to display your plants? Look no further! In this blog post, we will explore the world of creative upcycled plant containers. These containers not only add a touch of charm to your indoor or outdoor space but also help reduce waste by repurposing everyday items. Whether you’re a seasoned gardener or just starting out, this guide will provide you with plenty of inspiration and ideas for transforming ordinary objects into beautiful homes for your beloved plants. So, let’s dive in and discover the endless possibilities of creative upcycled plant containers!

DIY Ideas for Upcycled Plant Containers
Are you looking for creative ways to display your plants while also reducing waste? Upcycling old items into plant containers is a fantastic way to add a unique touch to your garden or indoor space. Not only does it give new life to old objects, but it also allows you to express your creativity and contribute to a more sustainable lifestyle. In this article, we will explore some DIY ideas for upcycled plant containers that are easy to make and will surely impress your friends and family.
1. Vintage Teacup Planters
One of the simplest and most charming ways to upcycle old items into plant containers is by using vintage teacups. These delicate and dainty cups can be easily transformed into adorable planters that add a touch of elegance to any space. To create your own teacup planter, you will need:
- A vintage teacup
- A small succulent or herb plant
- Well-draining potting soil
- A small pebble or stone
Start by placing the pebble or stone at the bottom of the teacup to provide drainage. Fill the cup with potting soil, leaving enough space for the plant. Gently remove the plant from its original container and place it in the teacup, ensuring it is centered. Add more soil around the plant, gently pressing it down to secure the plant in place. Water the plant lightly and place it in a bright spot where it can receive indirect sunlight. Your vintage teacup planter is now ready to be displayed and admired!
2. Wine Bottle Terrariums
If you have empty wine bottles lying around, why not turn them into beautiful terrariums? Terrariums are self-contained ecosystems that require minimal maintenance and are perfect for those who love low-maintenance plants. To create your own wine bottle terrarium, gather the following materials:
- An empty wine bottle
- A selection of small succulents or air plants
- Activated charcoal
- Well-draining potting soil
- Moss or decorative stones
Start by cleaning the wine bottle thoroughly to ensure it is free of any residues. Add a layer of activated charcoal at the bottom of the bottle to prevent odors and promote healthy plant growth. Next, add a layer of potting soil, leaving enough space for the plants. Carefully remove the plants from their containers and arrange them inside the bottle, using a long pair of tweezers or chopsticks to position them. Once the plants are in place, add some decorative moss or stones to create a visually appealing display. Place the terrarium in a well-lit area, but away from direct sunlight. Remember to mist the plants occasionally to provide them with the moisture they need. Your wine bottle terrarium is now ready to enhance your living space!
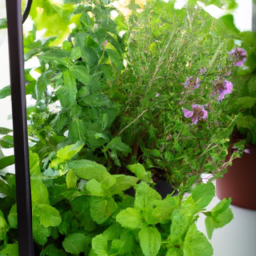
3. Wooden Crate Herb Garden
If you have an old wooden crate lying around, why not transform it into a functional and stylish herb garden? Growing your own herbs not only adds freshness to your cooking but also reduces waste by eliminating the need for store-bought herbs in plastic packaging. To create your own wooden crate herb garden, follow these steps:
- An old wooden crate
- Herb plants of your choice
- Well-draining potting soil
- Small rocks or pebbles
Start by lining the bottom of the crate with small rocks or pebbles to ensure proper drainage. Fill the crate with potting soil, leaving enough room for the herb plants. Gently remove the plants from their containers and arrange them in the crate, ensuring they have enough space to grow. Add more soil around the plants, gently pressing it down to secure them in place. Water the herbs thoroughly and place the crate in a sunny spot, such as a windowsill or balcony. Remember to water the herbs regularly and enjoy the convenience of having fresh herbs right at your fingertips!
These are just a few DIY ideas for upcycled plant containers. The possibilities are endless, and you can let your imagination run wild when it comes to repurposing old items into unique plant displays. Remember to have fun, experiment with different materials, and enjoy the process of creating something beautiful while reducing waste. Happy upcycling!
Unique and Creative Plant Containers from Recycled Materials
Are you a fan of gardening and looking for creative ways to display your plants? Look no further! In this article, we will explore the world of upcycled plant containers and how you can create unique and environmentally friendly displays for your plants using recycled materials. Let’s dive in!
Why Upcycle?
Before we delve into the world of creative upcycled plant containers, let’s take a moment to understand why upcycling is such a fantastic idea. Upcycling refers to the process of transforming discarded materials into something of higher value and quality. By upcycling, we can reduce waste, save money, and unleash our creativity.
When it comes to plant containers, upcycling offers endless possibilities. Not only can you create one-of-a-kind pieces, but you also contribute to a greener planet. So, let’s get started on your upcycling journey!
Materials to Consider
When it comes to upcycling plant containers, you can use a wide range of materials. Here are a few popular options:
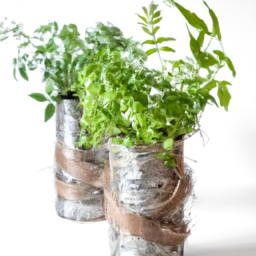
1. Tin Cans: Tin cans are versatile and can be easily transformed into unique plant containers. Make sure to clean them thoroughly and remove any sharp edges before using them. You can paint them, wrap them in twine, or even decoupage them for added visual appeal.
2. Wooden Pallets: Wooden pallets are a fantastic option for creating larger plant containers. You can stack them, nail them together, and create multi-level displays for your plants. The natural texture of wood adds a rustic charm to your garden.
3. Plastic Bottles: Plastic bottles are abundant and can be transformed into various plant containers. Cut them in half, create drainage holes, and paint or decorate them to match your garden aesthetic. Plastic bottles are particularly great for hanging planters.
4. Old Tires: Old tires are not only an eyesore when discarded but can also be harmful to the environment. By upcycling them into plant containers, you give them a new purpose. Paint them, stack them, or even cut them into unique shapes to create stunning displays for your plants.
Step-by-Step Guide
Now that you have an idea of the materials you can use, let’s dive into a step-by-step guide on creating unique upcycled plant containers:
Step 1: Gather Your Materials: Collect the materials you will need for your chosen upcycling project. This may include tin cans, wooden pallets, plastic bottles, old tires, paint, brushes, and any other decorative items you want to use.
Step 2: Prepare the Materials: Clean and prepare the materials according to your project. Remove any labels or stickers, wash the containers thoroughly, and make sure they are safe for planting.
Step 3: Design and Decoration: Let your creativity flow! Decide on the design and decoration for your plant containers. This could involve painting them in vibrant colors, adding patterns or textures, or even using decoupage techniques with old magazines or fabric scraps.
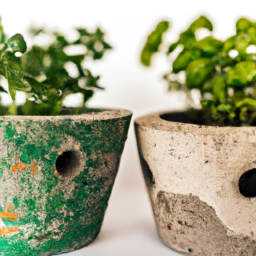
Step 4: Create Drainage Holes: Ensure proper drainage for your plants by creating holes in the bottom of your containers. This will prevent waterlogging and keep your plants healthy.
Step 5: Plant Your Greenery: Once your upcycled plant containers are ready, it’s time to plant your favorite greenery. Choose plants that thrive in the specific conditions of your garden or indoor space, and enjoy the satisfaction of seeing your unique creations come to life.
Step 6: Maintenance: Just like any other plant containers, your upcycled creations require regular maintenance. Water your plants as needed, provide them with adequate sunlight, and keep an eye out for any signs of pests or diseases.
With these simple steps, you can transform discarded materials into beautiful and creative plant containers. Not only will you have unique displays for your plants, but you will also contribute to a more sustainable and eco-friendly world.
So, gather your materials, unleash your creativity, and let your garden flourish with these upcycled plant containers. Happy gardening!
How to Make Eco-Friendly Planters from Upcycled Items
Are you looking for creative ways to display your plants while also being environmentally conscious? Upcycling is the perfect solution! By repurposing everyday items, you can create unique and eco-friendly plant containers that not only add a touch of creativity to your space but also help reduce waste. In this guide, we will explore three simple steps to make your own upcycled planters.
Finding the Right Materials
The first step in creating your upcycled plant containers is to find the right materials. Look around your home or visit local thrift stores, flea markets, or yard sales to discover items that can be repurposed into planters. The possibilities are endless, but here are a few ideas to get you started:
1. Tin Cans: Empty tin cans from food products can be transformed into charming planters. Make sure to clean them thoroughly and remove any sharp edges before using them for your plants.
2. Old Boots or Shoes: Give your worn-out footwear a new purpose by turning them into quirky planters. Fill them with soil and place small plants or succulents inside. This is a great way to add a playful touch to your garden or porch.
3. Mason Jars: If you have empty mason jars lying around, don’t throw them away! They make excellent planters for herbs or small flowers. You can even attach them to a wooden board to create a vertical garden.
Remember, the key is to be creative and think outside the box. Look for items that can hold soil and provide adequate drainage for your plants.
Preparing the Containers
Once you have gathered your upcycled items, it’s time to prepare them for planting. Here are the steps to follow:
1. Clean and Sanitize: Regardless of the material you choose, it’s essential to clean and sanitize the containers before using them for your plants. This helps remove any dirt, debris, or potential contaminants. Use warm soapy water and a brush to scrub the surfaces thoroughly.
2. Add Drainage Holes: Most upcycled items may not have drainage holes, which can lead to waterlogged soil and root rot. To prevent this, use a drill or a hammer and nail to create several small holes at the bottom of the container. This allows excess water to drain out and ensures the health of your plants.
3. Apply a Protective Coating: Depending on the material, you may want to apply a protective coating to prolong the lifespan of your upcycled planters. For example, if you are using wooden containers, consider using a non-toxic sealant or paint to protect them from moisture and decay.
By following these steps, you will have well-prepared upcycled containers ready for planting.
Planting and Caring for Your Upcycled Planters
Now that your upcycled planters are ready, it’s time to bring them to life with plants. Here’s what you need to do:
1. Choose the Right Plants: Consider the size and depth of your containers when selecting plants. Opt for small or compact varieties that won’t outgrow the space. Herbs, succulents, and small flowers are excellent choices for upcycled planters.
2. Use Quality Potting Soil: Fill the containers with a high-quality potting mix that provides good drainage and nutrients for your plants. Avoid using garden soil, as it may be too heavy and compacted for container gardening.
3. Water and Maintain: Just like traditional planters, upcycled plant containers require regular watering and maintenance. Monitor the moisture levels of the soil and water accordingly. Remember to follow the specific care instructions for each plant to ensure their well-being.
Additionally, keep an eye out for any signs of pests or diseases and take appropriate action to protect your plants.
By following these steps, you can enjoy the beauty of your upcycled planters while contributing to a more sustainable lifestyle.
In conclusion, creating eco-friendly planters from upcycled items is a fun and rewarding way to showcase your plants while reducing waste. By finding the right materials, preparing the containers, and caring for your upcycled planters, you can create a unique and sustainable display for your beloved plants. So, let your creativity bloom and start upcycling today!
Key Takeaways
Are you tired of using the same old boring plant pots for your indoor garden? Well, it’s time to get creative and give your plants a stylish makeover with upcycled plant containers! Not only will this add a unique touch to your home decor, but it’s also an eco-friendly way to repurpose items that would otherwise end up in the trash.
When it comes to upcycled plant containers, the possibilities are endless. You can turn old mason jars into charming hanging planters, use vintage tea cups to create a whimsical display, or even repurpose an old shoe as a quirky plant pot. Not only will these containers add character to your space, but they will also make your plants stand out and become conversation starters. Plus, upcycling allows you to unleash your creativity and show off your DIY skills. So, why not give it a try and transform your indoor garden into a green oasis with these creative upcycled plant containers? Your plants will thank you, and you’ll have a unique and sustainable home decor that will make your friends green with envy!
Here are the top questions that we were asked:
Q1: What are creative upcycled plant containers?
A1: Creative upcycled plant containers are unique and innovative ways of repurposing old or unused items into plant pots or containers. These containers can be made from various materials such as tin cans, old shoes, wine bottles, or even vintage teapots. They add a touch of creativity and sustainability to your garden or indoor plant collection.
Q2: Why should I use creative upcycled plant containers?
A2: Using creative upcycled plant containers not only adds a unique and charming aesthetic to your plants but also promotes sustainability and reduces waste. By repurposing old items that would otherwise end up in a landfill, you can contribute to a greener environment. Additionally, these containers can be a cost-effective alternative to purchasing new pots, as many upcycled options can be found around your home or at thrift stores.
Q3: How do I make my own creative upcycled plant containers?
A3: Making your own creative upcycled plant containers is a fun and rewarding DIY project. Start by gathering materials such as old containers, bottles, or any other item you want to repurpose. Clean and prepare the item, ensuring it is suitable for holding plants. Then, get creative with your decoration and customization. You can paint, decoupage, or add other embellishments to make the container visually appealing. Finally, add soil and your chosen plants, and you’re ready to display your unique creation!
Q4: What types of plants are suitable for creative upcycled plant containers?
A4: Almost any type of plant can thrive in a creative upcycled plant container, as long as the container provides adequate drainage and enough space for the plant’s roots to grow. However, it’s important to consider the specific needs of the plant you choose. Some plants may require more sunlight, while others prefer shade. Additionally, consider the size of the container and how it will accommodate the plant’s growth. Herbs, succulents, and small flowering plants are popular choices for upcycled containers due to their adaptability.
Q5: How do I maintain creative upcycled plant containers?
A5: Maintaining creative upcycled plant containers is similar to caring for any other plant pot. Ensure that your plants receive the appropriate amount of water, sunlight, and nutrients according to their specific needs. Regularly check the drainage of the container to prevent waterlogging, which can lead to root rot. If necessary, drill additional drainage holes in the upcycled container. Keep an eye out for pests or diseases, and promptly address any issues that arise. With proper care, your creative upcycled plant containers will continue to bring life and beauty to your surroundings.
Lisa Chen is a seasoned indoor gardening expert and the author of several bestselling books on the topic. With a background in horticulture and urban farming, Lisa is dedicated to helping urban dwellers embrace the joys of cultivating green spaces indoors. Her detailed guides and hands-on tips empower readers to transform their living spaces into thriving plant sanctuaries.