Are you an orchid enthusiast looking to expand your collection? If so, you’re in luck! In this blog post, we will explore the fascinating world of orchid propagation, specifically focusing on the journey from keiki to blooms. Orchids are known for their exquisite beauty and delicate nature, making them a popular choice among plant lovers. However, growing orchids from seeds can be a challenging and time-consuming process. That’s where keikis come in – these tiny plantlets that grow off the mother plant offer a quicker and more reliable way to propagate orchids. So, if you’re ready to learn all about the secrets of orchid propagation and witness the transformation from keiki to stunning blooms, keep reading!

Understanding Keiki: The Stages and Process of Orchid Propagation
Orchids are beautiful and delicate flowers that can bring a touch of elegance to any space. While they can be challenging to grow and propagate, understanding the process of orchid propagation from keiki to blooms can help you successfully expand your orchid collection. In this guide, we will explore the stages and process of orchid propagation, providing you with a step-by-step guide to ensure your success.
Stage 1: Identifying Keiki
The first stage in orchid propagation is identifying the keiki, which is the Hawaiian term for “baby” or “child.” Keikis are small plantlets that grow from the nodes of the mother orchid plant. They often appear as miniature versions of the parent plant, with their own leaves, roots, and even flowers.
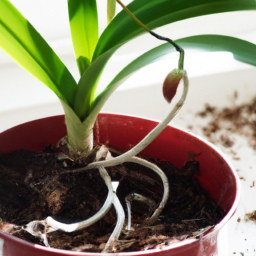
To identify a keiki, look for small plantlets that have grown from the nodes of the mother plant’s flower spike or pseudobulb. Keikis are usually attached to the parent plant by a thin stem, and they can be easily distinguished from roots or other growths. Once you have identified a keiki, you can proceed with the propagation process.
It’s important to note that not all orchid species produce keikis, so this method of propagation may not be applicable to all orchids. However, many popular orchid varieties, such as Phalaenopsis and Dendrobium, are known to produce keikis.
Stage 2: Separating the Keiki
Once you have identified a keiki, the next stage is to separate it from the mother plant. This process requires careful handling to ensure the keiki remains intact and has the best chance of survival.
Begin by preparing a clean and sterile cutting tool, such as a sharp knife or scissors. Gently hold the keiki and locate the point where it attaches to the mother plant. Using the cutting tool, carefully sever the connection between the keiki and the parent plant. Be cautious not to damage the keiki or the parent plant during this process.
After separating the keiki, it’s essential to provide it with a suitable growing environment. Prepare a small pot or container with a well-draining orchid mix or sphagnum moss. Place the keiki in the pot, ensuring that its roots are in contact with the growing medium. Avoid burying the keiki too deep as this can hinder its growth.
Stage 3: Nurturing the Keiki
Once the keiki is separated and potted, it’s time to nurture it and provide the optimal conditions for growth. Here are some essential steps to follow:
1. Light: Orchids require bright but indirect light to thrive. Place the potted keiki in a location where it can receive filtered sunlight or provide artificial lighting if necessary.
2. Temperature and Humidity: Orchids prefer temperatures between 60-80°F (15-27°C) during the day and slightly cooler temperatures at night. Additionally, they thrive in high humidity environments, around 50-70%. Consider using a humidifier or placing the keiki on a tray filled with water and pebbles to create a humid microclimate.
3. Watering: Orchids have specific watering requirements. Allow the potting medium to dry slightly between waterings, but avoid letting it completely dry out. Overwatering can lead to root rot, while underwatering can cause dehydration. Find the right balance by observing the moisture levels and adjusting your watering schedule accordingly.
4. Fertilization: Provide the keiki with a balanced orchid fertilizer at a diluted strength. Follow the manufacturer’s instructions for application frequency and dosage. Fertilizing helps promote healthy growth and blooming.
Continue to care for the keiki following these guidelines until it grows into a mature orchid plant. This process can take several months to years, depending on the orchid species and environmental conditions.
In conclusion, understanding the stages and process of orchid propagation from keiki to blooms is crucial for successful orchid cultivation. By identifying the keiki, separating it from the mother plant, and nurturing it in the right conditions, you can enjoy the beauty of your own propagated orchids. Remember to be patient and attentive to the needs of your keiki as it grows into a magnificent orchid plant.
Essential Techniques for Successful Orchid Keiki Propagation
Orchid propagation is an exciting endeavor for any plant lover. Witnessing the growth and blooming of these beautiful flowers is a rewarding experience. One particular method of orchid propagation is through the use of keikis, which are baby orchids that grow on the mother plant. In this guide, we will explore the essential techniques for successful orchid keiki propagation, allowing you to expand your orchid collection and enjoy the beauty of these stunning plants.
Understanding Keikis
Before we dive into the techniques, it’s important to understand what keikis are and how they form. Keikis are essentially clones of the mother plant, produced asexually. They are miniature versions of the parent orchid, complete with leaves, roots, and the potential to bloom. Keikis usually develop from nodes along the flower spike or at the base of the orchid plant.
Now that we have a basic understanding of keikis, let’s explore the essential techniques for successful propagation:
Technique 1: Identifying the Right Time
Timing is crucial when it comes to orchid keiki propagation. It’s best to wait until the keiki has developed its own set of roots, which indicates that it is ready to be separated from the mother plant. Typically, this occurs when the keiki reaches around one-third the size of the parent plant. Separating the keiki too early can hinder its growth, while waiting too long may cause it to become too attached to the mother plant, making separation more challenging.
Once you have identified a keiki that is ready for propagation, it’s time to move on to the next technique.
Technique 2: Preparing the Keiki for Separation
Before separating the keiki from the mother plant, it’s important to ensure that it is strong and healthy. This can be achieved by providing the keiki with optimal growing conditions. Ensure that it receives adequate light, water, and nutrients. You can also consider applying a rooting hormone to stimulate root growth, although this step is optional.
Once the keiki is thriving, it’s time to move on to the separation process.
Technique 3: Separating the Keiki
Separating the keiki from the mother plant requires precision and care to avoid damaging either the keiki or the parent orchid. Start by sterilizing a sharp knife or pair of scissors to minimize the risk of introducing infections. Gently hold the keiki in one hand, while carefully cutting the connecting tissue that links it to the mother plant. Ensure that each part has an adequate number of roots to support its growth.
After separation, it’s crucial to provide the keiki with a suitable growing environment to promote its development.
Nurturing the Keiki
Once the keiki has been separated, it’s time to nurture it to ensure its successful growth and eventual blooming. Here are a few key points to consider:
1. Potting: Transfer the keiki to a small pot filled with a well-draining orchid mix. Ensure that the pot has adequate drainage holes to prevent waterlogging, which can lead to root rot.
2. Light: Place the potted keiki in an area with bright, indirect light. Orchids thrive in environments with 12-14 hours of light per day, but direct sunlight can scorch their leaves.
3. Watering: Orchids prefer a humid environment, so mist the keiki regularly to maintain moisture levels. Water the plant thoroughly when the potting mix feels dry, but avoid overwatering as it can lead to root damage.
4. Temperature and Humidity: Orchids thrive in temperatures between 60-80°F (15-27°C) during the day and slightly cooler temperatures at night. Aim for a humidity level of around 50-70% to create an ideal growing environment.
With proper care and patience, your keiki will gradually develop into a mature orchid plant, ready to produce its own blooms.
In conclusion, orchid keiki propagation is a fascinating process that allows you to expand your orchid collection and witness the growth of these magnificent plants. By understanding the techniques involved, such as identifying the right time for separation, preparing the keiki, and nurturing it in an optimal environment, you can successfully propagate orchids from keiki to blooms. Enjoy the journey of orchid propagation and the beauty it brings to your surroundings!
Orchid Blooming: Tips and Tricks to Encourage Healthy Flowering
Orchids are known for their stunning and exotic blooms, and as an orchid enthusiast, you may be wondering how to encourage healthy flowering in your plants. Orchid blooming can be a rewarding experience, but it requires proper care, attention, and understanding of the plant’s needs. In this article, we will explore some tips and tricks that can help you achieve beautiful and long-lasting blooms in your orchids.
Understanding Orchid Blooming
Before we delve into the tips and tricks, it’s important to understand the natural blooming cycle of orchids. Orchids typically go through a period of dormancy, followed by a period of active growth and blooming. The length of these cycles can vary depending on the orchid species and environmental conditions.
During the dormancy period, the orchid conserves its energy and focuses on root growth. It may not produce any blooms during this time. As the plant enters the active growth phase, it starts developing new leaves, roots, and flower spikes. This is the stage where you can encourage and support healthy blooming.
Now, let’s move on to the tips and tricks that can help you maximize the blooming potential of your orchids.
Provide Adequate Light
Light is one of the most crucial factors for orchid blooming. Orchids require the right balance of light to trigger blooming. Insufficient light can result in weak and sparse blooms, while excessive light can lead to sunburn and damage the plant.
Most orchids thrive in bright, indirect light. Placing your orchids near a north or east-facing window is usually ideal. If you notice that your orchid leaves are turning yellow or developing brown spots, it may be a sign of too much direct sunlight. On the other hand, if the leaves are dark green and elongated, it could indicate insufficient light.
Observe your orchids closely and adjust their placement accordingly to provide them with the right amount of light. Remember, each orchid species may have slightly different light requirements, so it’s essential to research the specific needs of your orchids.
Optimize Temperature and Humidity
Orchids are native to tropical and subtropical regions, and they thrive in specific temperature and humidity ranges. Providing the right conditions can significantly impact the blooming of your orchids.
Most orchids prefer daytime temperatures between 70-85°F (21-29°C) and nighttime temperatures around 60-65°F (15-18°C). However, it’s important to note that different orchid species may have slightly different temperature preferences.
In addition to temperature, maintaining proper humidity levels is crucial for orchid blooming. Orchids generally prefer humidity levels between 50-70%. You can increase humidity by placing a tray filled with water near your orchids or using a humidifier. Regular misting of the leaves can also help create a humid environment.
By optimizing temperature and humidity, you can create a favorable environment for your orchids to bloom and thrive.
Proper Watering and Fertilization
Watering and fertilization play a vital role in orchid blooming. Orchids have unique watering needs, and overwatering or underwatering can hinder blooming.
Most orchids prefer a well-draining potting mix that allows excess water to drain away. Water your orchids thoroughly, ensuring that the water reaches the roots, and then allow the potting mix to dry out slightly before watering again. Avoid letting your orchids sit in standing water, as it can lead to root rot.
When it comes to fertilization, orchids have specific nutritional requirements. Use a balanced orchid fertilizer and follow the instructions on the packaging. During the active growth phase, fertilize your orchids every two weeks. However, during the dormancy period, reduce the frequency to once a month or suspend fertilization altogether.
Proper watering and fertilization practices will provide your orchids with the necessary nutrients and hydration to support healthy blooming.
Promote Air Circulation
Adequate air circulation is essential for orchid blooming. Good airflow helps prevent the buildup of excess moisture, which can lead to fungal and bacterial diseases.
Avoid crowding your orchids and ensure that they have enough space between them. This allows air to circulate freely around the plants. You can also use a small fan to create gentle air movement in the growing area.
Furthermore, avoid placing your orchids in areas with stagnant air, such as near heating or cooling vents. Proper air circulation will help keep your orchids healthy and promote blooming.
Patience and Observation
Finally, orchid blooming requires patience and careful observation. Each orchid is unique, and it may take time for them to adapt to their environment and start blooming.
Observe your orchids regularly, looking for any signs of new growth, such as the emergence of flower spikes or new leaves. Keep track of any changes in the plant’s appearance, including leaf color, texture, and overall health. This will help you identify any issues or adjustments needed to encourage blooming.
Remember, orchids are living organisms, and their blooming patterns can be influenced by various factors such as light, temperature, humidity, and overall plant health. By being patient and observant, you can provide the best care for your orchids and enjoy the beauty of their blooms.
In conclusion, orchid blooming is a fascinating process that requires attention to detail and understanding of the plant’s needs. By providing adequate light, optimizing temperature and humidity, practicing proper watering and fertilization, promoting air circulation, and being patient and observant, you can encourage healthy blooming in your orchids. Enjoy the journey of nurturing your orchids and witnessing the breathtaking blooms they produce!
Let’s bring it all home
Have you ever wondered how to propagate orchids and grow beautiful blooms from keikis? Well, you’re in luck because today we’re going to dive into the fascinating world of orchid propagation. Keikis, which are baby orchids that grow off the mother plant, can be easily propagated and nurtured into stunning adult orchids.
To start the propagation process, you’ll need to identify a healthy keiki on your orchid. Once you’ve found one, carefully remove it from the mother plant, making sure to keep the roots intact. Next, prepare a small pot with a well-draining orchid mix and place the keiki in it, ensuring that the roots are covered with the growing medium. Now it’s time to provide the right conditions for your keiki to thrive. Place the pot in a warm and humid environment, with indirect sunlight. Mist the keiki regularly and water it once or twice a week, making sure not to overwater. With patience and care, your keiki will grow into a mature orchid plant, eventually producing beautiful blooms that will fill your space with their enchanting fragrance.
So, if you’re ready to embark on a rewarding journey of orchid propagation, why not give it a try? With a little bit of knowledge and a lot of love, you can transform a tiny keiki into a blooming beauty that will bring joy and elegance to your home or garden.
Your Burning Questions Answered:
Q1: What is orchid propagation?
A1: Orchid propagation refers to the process of reproducing orchids by creating new plants from existing ones. It involves various methods such as keiki propagation, division, backbulb propagation, and tissue culture.
Q2: What is a keiki in orchid propagation?
A2: In orchid propagation, a keiki is a Hawaiian word meaning “baby” or “child.” It refers to a new plant that develops as an offshoot from the base of the mother orchid. Keikis are essentially clones of the parent plant and can be separated to grow into independent orchids.
Q3: How do I encourage keiki growth in my orchid?
A3: To encourage keiki growth in your orchid, you can provide the plant with the right conditions. This includes providing adequate light, humidity, and temperature. Additionally, you can try misting the plant regularly, providing proper fertilization, and ensuring good air circulation around the orchid.
Q4: How do I propagate orchids from keikis?
A4: Propagating orchids from keikis is relatively simple. Once the keiki has developed roots of at least a few inches long, you can carefully remove it from the parent plant using a sterile cutting tool. Then, plant the keiki in a suitable orchid potting mix, ensuring the roots are covered but the leaves are exposed. Provide the keiki with the same care as you would for a mature orchid.
Q5: How long does it take for a keiki to bloom?
A5: The time it takes for a keiki to bloom can vary depending on several factors, such as the orchid species, growing conditions, and the age of the keiki itself. Generally, it can take anywhere from several months to a couple of years for a keiki to reach maturity and produce its first blooms. Patience and proper care are key in nurturing the keiki until it reaches its blooming stage.
Dr. Olivia Green is a botanist with over two decades of experience in indoor plant cultivation. She holds a Ph.D. in Plant Biology and has dedicated her career to researching plant behavior in controlled environments. Dr. Green is passionate about helping plant enthusiasts master the art of indoor gardening through her extensive knowledge and practical insights.