Are your indoor plants looking a bit lackluster lately? It might be time to consider repotting them. Knowing when to repot indoor plants is crucial for their health and growth. Over time, plants can outgrow their pots, leading to root-bound conditions that stunt their growth. In this blog post, we’ll discuss the signs that indicate it’s time to repot your indoor plants and provide you with step-by-step instructions on how to do it properly. So, grab your gardening gloves and let’s get started!
Signs that Indicate It’s Time to Repot Your Indoor Plants
Yellowing or Wilting Leaves
One of the most common signs that your indoor plant needs to be repotted is yellowing or wilting leaves. This is often a sign that the plant has outgrown its current container and is not getting enough nutrients or water. When the roots of a plant become overcrowded, they can no longer absorb water and nutrients effectively, leading to yellowing or wilting leaves. If you notice this happening to your plant, it’s time to consider repotting.
Another reason for yellowing or wilting leaves could be that the soil in the current pot has become compacted and is no longer providing adequate drainage. This can lead to root rot, which can further exacerbate the issue. Repotting your plant into fresh, well-draining soil can help alleviate this problem and promote healthy growth.
In some cases, yellowing or wilting leaves could also be a sign of nutrient deficiency. When a plant is not getting enough nutrients from the soil, it will start to show signs of distress through its leaves. Repotting your plant into fresh soil with added nutrients can help revitalize it and promote healthy leaf growth.
Roots Growing Out of Drainage Holes
Another clear sign that your indoor plant needs to be repotted is when you start to see roots growing out of the drainage holes at the bottom of the pot. This is a sure sign that the plant has outgrown its current container and is in need of more space to continue growing healthily.
When roots start to grow out of the drainage holes, it means that the plant has used up all the available space in the pot and is now searching for more room to expand. If left unchecked, the roots can become root-bound, which can lead to stunted growth and poor overall health for the plant. Repotting the plant into a larger container will provide the roots with the space they need to continue growing and thriving.
In some cases, roots growing out of drainage holes can also indicate that the plant is not getting enough water or nutrients from the soil. When the roots are unable to access the necessary resources, they will start to grow out of the pot in search of them. Repotting the plant into fresh soil with added nutrients can help address this issue and promote healthy root growth.
Stagnant Growth or Decline in Health
If you notice that your indoor plant has stopped growing or is showing signs of decline in health, it may be time to consider repotting. Stagnant growth or a decline in health can be a sign that the plant is not getting the necessary nutrients or space to continue thriving in its current container.
When a plant becomes root-bound, it can no longer absorb water and nutrients effectively, leading to stagnant growth or a decline in health. Repotting the plant into a larger container with fresh soil can help provide the roots with the space they need to grow and access the necessary resources for healthy growth.
In some cases, stagnant growth or a decline in health could also be a sign of pest infestation or disease. If you notice any unusual spots on the leaves, sticky residue, or webbing on the plant, it’s important to address the issue promptly before repotting. Once the pest infestation or disease has been treated, you can then repot the plant into fresh soil to help promote recovery and healthy growth.
By keeping an eye out for these signs and symptoms, you can ensure that your indoor plants are happy and healthy. Knowing when to repot your plants is crucial for their overall well-being and growth. Remember to always choose a pot that is slightly larger than the current one to allow for proper root growth and development. Happy repotting!
Best Practices for Repotting Indoor Plants
Understanding When to Repot Indoor Plants
When it comes to indoor plants, repotting is an essential task that should not be overlooked. Knowing when to repot your indoor plants is crucial for their health and growth. The general rule of thumb is to repot your indoor plants every 1-2 years, or when you notice the roots becoming root-bound. Root-bound plants have roots that are tightly packed and circling the bottom of the pot, which can restrict the plant’s growth and access to nutrients.
Another sign that your indoor plant needs repotting is when you notice the plant becoming top-heavy or leaning to one side. This can indicate that the plant has outgrown its current pot and needs a larger container for stability. Additionally, if you see roots growing out of the drainage holes at the bottom of the pot, it is definitely time to repot your indoor plant.
Preparing to Repot Indoor Plants
Before you begin the repotting process, gather all the necessary materials and tools. You will need a new pot that is slightly larger than the current one, fresh potting soil, a trowel or shovel, and gloves to protect your hands. Make sure to choose a pot with drainage holes to prevent overwatering and root rot.
Start by watering your indoor plant a day or two before repotting to make the roots easier to work with. Carefully remove the plant from its current pot by gently squeezing the sides of the pot and tipping it over. Gently loosen the roots and remove any dead or rotting roots before transferring the plant to the new pot.
Repotting Indoor Plants
When repotting your indoor plant, fill the new pot with fresh potting soil, leaving enough room at the top for the plant to sit comfortably. Place the plant in the center of the pot and fill in the gaps with more potting soil, pressing down gently to secure the plant in place. Water the plant thoroughly after repotting to help settle the soil and hydrate the roots.
After repotting, place your indoor plant in a location with adequate sunlight and proper air circulation to promote healthy growth. Monitor the plant closely in the weeks following repotting to ensure it is adjusting well to its new environment. Remember to continue regular care and maintenance, including watering, fertilizing, and pruning as needed.
By following these best practices for repotting indoor plants, you can help your plants thrive and continue to bring beauty and greenery to your indoor space. Remember to repot your indoor plants when needed to ensure they have enough room to grow and flourish.
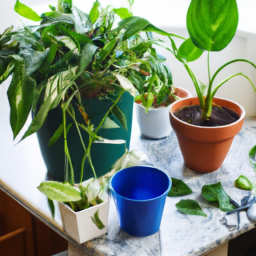
Choosing the Right Potting Mix for Repotting Indoor Plants
Understanding the Importance of the Right Potting Mix
When it comes to repotting indoor plants, choosing the right potting mix is crucial for the health and growth of your plants. The potting mix provides essential nutrients, aeration, and drainage for the roots of your plants. Using the wrong potting mix can lead to root rot, nutrient deficiencies, and overall poor plant health.
One of the most important factors to consider when choosing a potting mix is the type of plant you are repotting. Different plants have different soil requirements, so it’s essential to choose a potting mix that is tailored to the specific needs of your plant. For example, succulents and cacti require a well-draining potting mix with added sand or perlite, while tropical plants may need a mix with more organic matter for moisture retention.
Another factor to consider is the size of the pot your plant will be repotted into. Larger pots require a potting mix that provides good drainage and aeration to prevent waterlogging, while smaller pots may need a mix that retains moisture for longer periods. It’s important to match the potting mix to the size of the pot to ensure optimal growing conditions for your plant.
When choosing a potting mix, look for one that is specifically labeled for indoor plants. These mixes are typically well-balanced and provide the necessary nutrients for healthy plant growth. Avoid using garden soil or compost for indoor plants, as these can compact over time and hinder root growth. Opt for a high-quality potting mix that is lightweight, well-draining, and rich in organic matter for the best results.
Types of Potting Mixes
There are several types of potting mixes available on the market, each tailored to the specific needs of different plants. Here are some common types of potting mixes and their characteristics:
1. Peat-based Mix: Peat-based mixes are lightweight and retain moisture well, making them ideal for plants that require consistent moisture levels. These mixes are typically made from peat moss, perlite, and vermiculite, providing good aeration and drainage for healthy root growth.
2. Bark-based Mix: Bark-based mixes are well-draining and provide excellent aeration for plant roots. These mixes are ideal for plants that prefer drier conditions, such as orchids and succulents. Bark-based mixes are typically made from pine bark, perlite, and peat moss, providing a lightweight and well-balanced mix for optimal plant growth.
3. Cactus Mix: Cactus mixes are specially formulated for plants that require excellent drainage and minimal moisture retention, such as cacti and succulents. These mixes are typically made from sand, perlite, and peat moss, providing the perfect balance of aeration and drainage for desert plants.
When choosing a potting mix, consider the specific needs of your plant and match the mix to those requirements for the best results. It’s essential to repot your indoor plants with a high-quality potting mix to ensure healthy growth and prevent issues such as root rot and nutrient deficiencies.
Tips for Repotting Indoor Plants
When repotting your indoor plants, follow these tips to ensure a successful transition:
1. Choose the right pot size: Select a pot that is 1-2 inches larger in diameter than the current pot to allow room for growth. Ensure the pot has drainage holes to prevent waterlogging.
2. Gently remove the plant from its current pot: Carefully loosen the roots and remove any old potting mix from the roots. Trim any damaged or rotting roots with clean scissors.
3. Add fresh potting mix to the new pot: Fill the bottom of the pot with a layer of potting mix, then place the plant in the center and fill in around the roots with more mix. Press the mix down gently to secure the plant in place.
4. Water thoroughly: After repotting, water the plant thoroughly to help settle the new mix and hydrate the roots. Allow any excess water to drain out of the pot to prevent waterlogging.
5. Place the plant in its new location: Place the repotted plant in a location that meets its light and temperature requirements. Avoid placing the plant in direct sunlight or near drafts.
By following these tips and choosing the right potting mix for your indoor plants, you can ensure healthy growth and vibrant foliage for years to come. Repotting your plants with care and attention to detail will help them thrive and beautify your indoor space.
Here’s the Summary Snapshot
If you’ve noticed your indoor plant looking a bit sad or not thriving as well as it used to, it might be time to consider repotting it. Repotting indoor plants is an essential part of plant care that often gets overlooked. Knowing when to repot your plants can help them grow healthier and happier.
One sign that it’s time to repot your indoor plant is if you notice roots growing out of the drainage holes at the bottom of the pot. This is a clear indication that the plant has outgrown its current container and needs more space to grow. Additionally, if you see the soil drying out much faster than usual or the plant becoming root-bound, it’s probably time for a new pot. Repotting your indoor plants every 1-2 years can help prevent them from becoming root-bound and ensure they have enough room to grow and thrive.
Top FAQs:
Q1. How do I know when it’s time to repot my indoor plants?
A1. You’ll know it’s time to repot your indoor plant when you see roots growing out of the drainage holes, the plant is becoming root-bound, or the plant is not thriving as it used to.
Q2. What is the best time of year to repot indoor plants?
A2. The best time to repot indoor plants is usually in the spring, as this is when plants are actively growing and will recover more quickly from the repotting process.
Q3. How do I choose the right pot for repotting my indoor plant?
A3. When choosing a pot for repotting, make sure it is slightly larger than the current pot, has drainage holes, and is made of a breathable material like terracotta or ceramic.
Q4. How should I prepare my indoor plant for repotting?
A4. Before repotting your indoor plant, water it thoroughly a day or two before to make the roots easier to work with. Gently loosen the roots and remove any dead or rotting roots before placing it in the new pot.
Q5. What should I do after repotting my indoor plant?
A5. After repotting your indoor plant, water it thoroughly and place it in a location with the appropriate light and temperature conditions. Monitor the plant closely for the next few weeks to ensure it adjusts well to its new pot.

James Wong is a renowned ethnobotanist, plant scientist, and local television presenter. With a passion for demystifying plant science, he is known for translating complex botanical concepts into practical advice for everyday plant enthusiasts. James’s expertise spans from traditional gardening to cutting-edge plant technologies, making his insights accessible and informative.

