Have you ever wondered if there’s a way to unlock new plant possibilities without having to rely on seeds or traditional methods of propagation? Well, you’re in luck! In this blog post, we will delve into the fascinating world of plant propagation by leaf cuttings. Yes, that’s right – Unlocking New Plant Possibilities: Propagation by Leaf Cuttings is an innovative technique that allows you to grow new plants from just a single leaf. It may sound too good to be true, but this method has been practiced by gardeners and plant enthusiasts for centuries, and it continues to amaze with its simplicity and effectiveness. So, if you’re ready to explore a whole new realm of plant propagation, keep reading to discover the wonders of unlocking new plant possibilities through leaf cuttings.

Benefits of Propagation by Leaf Cuttings in Plant Propagation Techniques
Welcome to this comprehensive guide on unlocking new plant possibilities through the technique of propagation by leaf cuttings. In this article, we will explore the numerous benefits of this method and provide you with a step-by-step guide to help you successfully propagate plants using leaf cuttings.
Understanding Propagation by Leaf Cuttings
Propagation by leaf cuttings is a fascinating technique that allows us to create new plants from a single leaf. Unlike other methods of propagation, such as seed germination or stem cuttings, leaf cuttings offer unique advantages that make them a preferred choice for many gardeners and horticulturists.
One of the key benefits of leaf cuttings is the ability to produce multiple plants from a single leaf. This means that you can propagate a large number of plants from a single parent plant, allowing for rapid expansion of your garden or nursery. Additionally, leaf cuttings offer a higher success rate compared to other propagation methods, making it an ideal choice for beginners and experienced gardeners alike.
Another advantage of leaf cuttings is the ability to preserve the exact traits of the parent plant. This is particularly important when propagating plants with desirable characteristics, such as unique leaf patterns, vibrant colors, or specific growth habits. By using leaf cuttings, you can ensure that the new plants will retain these traits, resulting in a consistent and visually appealing garden.
The Step-by-Step Guide to Propagation by Leaf Cuttings
Now that we have explored the benefits of propagation by leaf cuttings, let’s dive into the step-by-step process to unlock new plant possibilities:
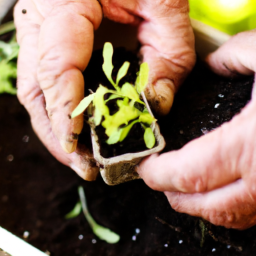
Step 1: Selecting the Parent Plant: Choose a healthy and mature plant with desirable traits that you wish to propagate. Look for a leaf that is fully developed and free from any signs of disease or damage.
Step 2: Preparing the Leaf Cutting: Using a clean and sharp knife or scissors, carefully cut the leaf from the parent plant. Make sure to include a small portion of the stem (petiole) attached to the leaf. Remove any lower leaves from the stem to promote better rooting.
Step 3: Preparing the Potting Medium: Fill a small pot or container with a well-draining potting mix. A mixture of peat moss and perlite or vermiculite works well for most plants. Moisten the potting mix slightly to provide a suitable environment for root development.
Step 4: Planting the Leaf Cutting: Create a small hole in the potting mix using your finger or a pencil. Insert the cut end of the leaf cutting into the hole, ensuring that the petiole is buried in the potting mix while the leaf remains above the surface. Gently press the soil around the cutting to secure it in place.
Step 5: Providing Optimal Conditions: Place the potted leaf cutting in a warm and well-lit area, away from direct sunlight. Maintain a consistent level of moisture in the potting mix by misting it regularly or covering the pot with a plastic bag to create a mini greenhouse effect. Avoid overwatering, as it can lead to rotting.
Step 6: Root Development: Over the next few weeks, the leaf cutting will develop roots. You can gently tug on the leaf to check for resistance, indicating root growth. Once the roots have established, you can gradually acclimate the new plant to normal growing conditions.
Step 7: Transplanting: Once the new plant has developed a sufficient root system and a few new leaves, it is ready to be transplanted into a larger pot or directly into the garden. Follow the specific care instructions for the particular plant species to ensure its successful growth and development.
By following these steps, you can unlock new plant possibilities through the technique of propagation by leaf cuttings. Experiment with different plant species and explore the exciting world of plant propagation. Happy gardening!

Step-by-Step Guide to Unlocking New Plant Possibilities through Leaf Cutting Propagation
Introduction
Propagation by leaf cuttings is an exciting and effective way to unlock new plant possibilities. This method allows you to create new plants from existing ones, expanding your garden or collection without the need for seeds or expensive nursery-bought plants. In this step-by-step guide, we will explore the process of leaf cutting propagation, from selecting the right plant to caring for the newly propagated cuttings. Let’s dive in and discover the wonders of unlocking new plant possibilities!
Choosing the Right Plant
When it comes to leaf cutting propagation, not all plants are created equal. Some plants are more suitable for this method than others. To increase your chances of success, it’s crucial to choose the right plant. Look for plants that have fleshy leaves, as they tend to root more easily. Succulents, such as jade plants, snake plants, and echeverias, are excellent choices for beginners. They are hardy, forgiving, and propagate readily from leaf cuttings. Other popular options include begonias, African violets, and peperomias.
Once you’ve selected your plant, examine it closely to find a healthy, mature leaf for propagation. Avoid using damaged or diseased leaves, as they are less likely to produce viable cuttings. Look for leaves that are plump, firm, and free from blemishes. It’s also important to choose a leaf that is fully grown but not yet old and yellowing. This ensures that the leaf has enough energy and nutrients to support root development.
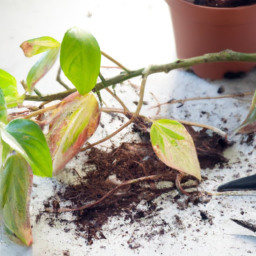
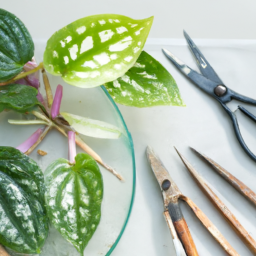
Preparing the Leaf Cutting
Now that you have chosen the perfect leaf for propagation, it’s time to prepare it for rooting. Start by sterilizing your tools to prevent the spread of diseases. Clean a sharp knife or pair of scissors with rubbing alcohol or a mixture of bleach and water. Once your tools are clean, carefully remove the selected leaf from the plant. Make a clean cut at the base of the leaf, ensuring that you include a small portion of the stem. This stem will serve as the starting point for root development.
After removing the leaf, you may need to make additional cuts or preparations, depending on the plant species. Some plants, like African violets, require the removal of the leaf’s central vein. Others, like snake plants, benefit from cutting the leaf into smaller sections. Research your specific plant to determine if any additional preparations are necessary. Once you’ve made all the required cuts, set the leaf cutting aside and allow the wounds to dry and callus for a day or two. This step helps prevent rotting and increases the chances of successful rooting.
Rooting the Leaf Cutting
With the leaf cutting prepared, it’s time to root it and unlock its full potential. There are several methods you can use to root leaf cuttings, but the most common and straightforward approach is water propagation. Fill a small container with clean, room-temperature water and place the leaf cutting in it. Make sure that at least half of the stem is submerged in the water. You may need to use a toothpick or a small piece of wire to support the leaf and keep it from falling into the water.
Find a bright spot in your home or garden where the leaf cutting can receive indirect sunlight. Avoid placing it in direct sunlight, as this can cause the leaf to wither or burn. Change the water every few days to prevent the growth of algae or the buildup of harmful bacteria. Be patient, as rooting can take anywhere from a few weeks to a few months, depending on the plant species. Monitor the progress of the leaf cutting and look for the emergence of tiny roots. Once the roots have reached a sufficient length, you can proceed to the next step.
Transplanting and Caring for the New Plant
Congratulations! Your leaf cutting has successfully rooted, and it’s time to give it a new home. Prepare a small pot with well-draining soil, specifically formulated for the type of plant you are propagating. Gently remove the leaf cutting from the water, being careful not to damage the delicate roots. Make a small hole in the soil and place the cutting in it, ensuring that the roots are covered and the leaf is above the soil surface.
Water the newly transplanted cutting thoroughly, allowing the soil to become evenly moist but not waterlogged. Place the pot in a warm, well-lit area, but again, avoid direct sunlight. Over the next few weeks, monitor the moisture levels of the soil and water as needed. Be patient and provide your new plant with the care it requires, including regular watering, appropriate light conditions, and occasional fertilization. As the plant grows and matures, you can gradually transition to a larger pot, if necessary.
Conclusion
Unlocking new plant possibilities through leaf cutting propagation is a rewarding and fascinating journey. With a little patience and care, you can create an entire garden of plants from a single leaf. Remember to choose the right plant, prepare the leaf cutting properly, root it in water, and transplant it into a suitable pot. As you gain experience and confidence, you can experiment with different plant species and propagation methods. Enjoy the process, and may your garden flourish with the endless possibilities of leaf cutting propagation!
Successful Examples of Plant Varieties Propagated by Leaf Cuttings and their Unique Traits
Propagation by leaf cuttings is a fascinating technique that allows us to unlock new plant possibilities and explore the vast world of horticulture. By understanding the process and exploring successful examples, we can delve deeper into the art of plant propagation and appreciate the unique traits that each variety brings. In this article, we will take a closer look at three plant varieties that have been successfully propagated by leaf cuttings, highlighting their distinct characteristics and how you can propagate them yourself.
1. African Violet (Saintpaulia ionantha)
The African Violet is a popular houseplant known for its vibrant, velvety flowers and attractive foliage. One of the most successful examples of propagation by leaf cuttings, this method allows you to create new plants from a single leaf. Here’s how you can do it:
Step 1: Select a healthy leaf from the African Violet plant. Choose a mature leaf that is free from any signs of disease or damage.
Step 2: Cut the leaf at the base, ensuring that you have a clean, straight cut.
Step 3: Prepare a well-draining potting mix. African Violets prefer a slightly acidic soil mix that is rich in organic matter.
Step 4: Insert the leaf cutting into the potting mix, burying the cut end about an inch deep. Ensure that the leaf is placed upright and the cut end is in contact with the soil.
Step 5: Place the pot in a warm, bright location but avoid direct sunlight. Maintain a consistent level of moisture in the soil by misting or watering lightly.
Step 6: After a few weeks, you will notice tiny plantlets emerging from the base of the leaf. Once these plantlets have developed a few leaves of their own, gently separate them from the leaf and transplant them into individual pots.
African Violets propagated by leaf cuttings often retain the characteristics of the parent plant, including flower color and leaf shape. This method allows you to create multiple plants from a single leaf, making it an efficient and rewarding propagation technique.
2. Jade Plant (Crassula ovata)
The Jade Plant, also known as the Money Tree or Friendship Tree, is a popular succulent that is cherished for its fleshy, oval-shaped leaves and resilience. Propagating Jade Plants through leaf cuttings is a simple and effective way to expand your collection. Here’s how you can do it:
Step 1: Select a healthy leaf from the Jade Plant. Choose a plump, mature leaf without any signs of damage or disease.
Step 2: Gently twist the leaf from the stem, ensuring that a small piece of the stem remains attached to the leaf.
Step 3: Allow the leaf cutting to dry for a few days until the wound calluses over. This helps prevent rotting when the cutting is planted.
Step 4: Prepare a well-draining potting mix suitable for succulents. A mix of cactus soil and perlite works well for Jade Plants.
Step 5: Insert the leaf cutting into the potting mix, burying the callused end about an inch deep. Ensure that the leaf is placed upright and the callused end is in contact with the soil.
Step 6: Place the pot in a bright location with indirect sunlight. Water sparingly, allowing the soil to dry out between waterings.
Step 7: After a few weeks, roots will begin to develop from the callused end of the leaf, and new plantlets will emerge. Once the plantlets have grown a few inches tall, you can gently separate them from the leaf and transplant them into individual pots.
Jade Plants propagated by leaf cuttings often retain the same characteristics as the parent plant, including their iconic fleshy leaves and compact growth habit. This method allows you to create new plants that are genetically identical to the parent, ensuring consistency in appearance and traits.
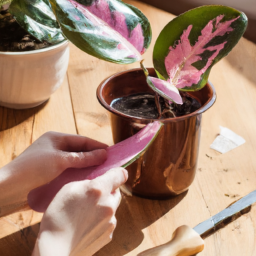
3. Begonia (Begonia spp.)
Begonias are a diverse group of plants known for their stunning foliage and beautiful flowers. Leaf cuttings offer an excellent way to propagate Begonias and explore the vast array of varieties available. Here’s how you can do it:
Step 1: Select a healthy, mature leaf from the Begonia plant. Choose a leaf that is free from any signs of disease or damage.
Step 2: Cut the leaf into sections, ensuring that each section has a prominent vein running through it. The sections should be around 2-3 inches in length.
Step 3: Prepare a well-draining potting mix. Begonias prefer a soil mix that is rich in organic matter and provides good drainage.
Step 4: Insert the leaf sections into the potting mix, burying them about half an inch deep. Ensure that the sections are placed upright, with the cut end in contact with the soil.
Step 5: Place the pot in a warm, bright location with indirect sunlight. Mist the leaf sections regularly to maintain high humidity levels.
Step 6: After a few weeks, you will notice tiny plantlets emerging from the base of each leaf section. Once these plantlets have developed roots and a few leaves, gently separate them from the leaf and transplant them into individual pots.
Begonias propagated by leaf cuttings exhibit a wide range of unique traits, including leaf shape, color patterns, and flower forms. This method allows you to explore the vast diversity within the Begonia genus and create new plants that showcase these distinctive characteristics.
Propagation by leaf cuttings opens up a world of possibilities in plant propagation. By following these step-by-step guides and exploring successful examples like African Violets, Jade Plants, and Begonias, you can unlock new plant possibilities and enjoy the rewards of propagating your favorite varieties. So go ahead, grab your gardening tools, and embark on an exciting journey of unlocking the potential of leaf cuttings!
Let’s bring it all home
Have you ever wondered how new plants are created? It turns out that there is a fascinating method called propagation by leaf cuttings that allows us to unlock new plant possibilities. This technique involves taking a leaf from a mature plant and encouraging it to grow roots and develop into a whole new plant. It may sound like magic, but it’s actually a simple and effective way to expand your plant collection.
Propagation by leaf cuttings is a popular method among plant enthusiasts because it allows them to create multiple plants from a single leaf. All you need to do is carefully remove a healthy leaf from the parent plant, making sure to include a small portion of the stem. Then, you can place the leaf in a container filled with a well-draining potting mix and keep it moist. Over time, the leaf will start to develop roots, and eventually, a new plant will emerge. This technique works well for a variety of plants, including succulents, African violets, and many others. So, if you’re looking to expand your plant collection or share your favorite plants with friends, propagation by leaf cuttings is definitely worth a try!
FAQ Roundup:
Q1: What is propagation by leaf cuttings?
A1: Propagation by leaf cuttings is a method of reproducing plants by taking a leaf from a parent plant and using it to grow a new plant. It involves cutting a healthy leaf from the parent plant, allowing it to form roots, and then planting it in soil or a suitable growing medium to develop into a new plant.
Q2: What are the benefits of propagation by leaf cuttings?
A2: Propagation by leaf cuttings offers several benefits. It allows you to create new plants from existing ones without the need for seeds or specialized equipment. It can be a cost-effective way to expand your plant collection or share plants with others. Additionally, some plants may be more easily propagated through leaf cuttings compared to other methods.
Q3: Which plants can be propagated through leaf cuttings?
A3: Many plants can be propagated through leaf cuttings, including popular houseplants like succulents (such as jade plants and echeverias), African violets, and begonias. Some herbaceous perennials, such as certain types of coleus and pothos, can also be propagated successfully using this method. However, not all plants can be propagated through leaf cuttings, so it’s important to research the specific plant you’re interested in.
Q4: How do I propagate plants through leaf cuttings?
A4: To propagate plants through leaf cuttings, start by selecting a healthy leaf from the parent plant. Make a clean cut just below the leaf node, which is where the leaf meets the stem. Remove any lower leaves, leaving only a few at the top. Place the leaf in a well-draining soil or a suitable growing medium, ensuring the cut end is inserted into the soil. Keep the soil moist but not waterlogged, and provide indirect light. Over time, the leaf will form roots, and a new plantlet will emerge.
Q5: How long does it take for leaf cuttings to develop into new plants?
A5: The time it takes for leaf cuttings to develop into new plants can vary depending on the plant species and environmental conditions. In general, it can take several weeks to a few months for roots to form and new growth to appear. Patience is key when propagating plants through leaf cuttings, as some species may take longer than others. It’s important to provide the right conditions and regularly monitor the progress of your leaf cuttings.
Dr. Olivia Green is a botanist with over two decades of experience in indoor plant cultivation. She holds a Ph.D. in Plant Biology and has dedicated her career to researching plant behavior in controlled environments. Dr. Green is passionate about helping plant enthusiasts master the art of indoor gardening through her extensive knowledge and practical insights.