Are you a plant lover looking to expand your collection? If so, you’re in luck! In this blog post, we’re going to dive into the world of multiplying your plant collection through the art of division propagation. Yes, you heard that right – division propagation is the secret to rapidly increasing the number of plants in your collection. Whether you’re a seasoned gardener or just starting out, mastering division propagation can be a game-changer. So, grab your gardening gloves and get ready to learn the ins and outs of this fantastic technique.

The Basics of Division Propagation: A Step-by-Step Guide
Welcome to the world of division propagation, a fascinating technique that allows you to multiply your plant collection with ease. Whether you are a seasoned gardener or just starting out, this step-by-step guide will help you master division propagation and unlock the potential of your plants. So, let’s dive in and learn the basics!
What is Division Propagation?
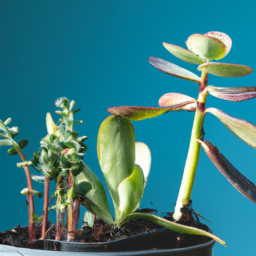
Division propagation is a method of plant propagation where you divide an existing plant into multiple parts, each of which can grow into a new individual plant. This technique is particularly useful for plants that naturally produce offsets, suckers, or clumps, as it allows you to create new plants without relying on seeds or cuttings.
To get started with division propagation, you’ll need a healthy and mature plant that has developed multiple shoots or stems. It’s important to choose a plant that is well-established and has enough energy reserves to support the divided sections.
Now, let’s move on to the step-by-step process of division propagation:
Step 1: Prepare the Tools and Workspace
Before you begin dividing your plant, gather all the necessary tools. You’ll need a sharp and clean pair of pruning shears or a garden knife, a clean pot or container for each divided section, and a suitable potting mix. Make sure your tools are sterilized to minimize the risk of introducing diseases or infections to the plants.
Set up your workspace in a well-lit area with enough room to comfortably work with your plant. Lay down a clean surface, such as a gardening table or a tarp, to catch any soil or plant debris.
Once your tools and workspace are ready, it’s time to move on to the next step.
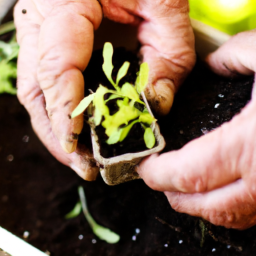
Step 2: Remove the Plant from its Container
Carefully remove the plant from its container, taking care not to damage the roots or disturb the soil too much. Gently tap the sides of the container or squeeze it to loosen the root ball and facilitate removal.
If the plant is tightly root-bound, you may need to use your pruning shears or a garden knife to make a few vertical cuts along the sides of the root ball. This will help loosen the roots and make division easier.
Once the plant is out of its container, gently shake off excess soil to expose the root structure. This will make it easier to identify where to make the divisions.
Step 3: Divide the Plant
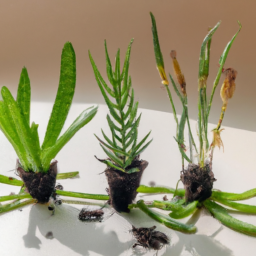
Inspect the root structure and identify natural divisions or sections that can be separated into individual plants. Look for areas where the plant has naturally formed separate shoots, stems, or clumps. These are the ideal spots for division.
Using your sharp pruning shears or garden knife, carefully make clean cuts to separate the sections. Make sure each divided section has enough roots and shoots to grow independently. Avoid tearing or damaging the roots, as this can hinder the growth of the new plants.
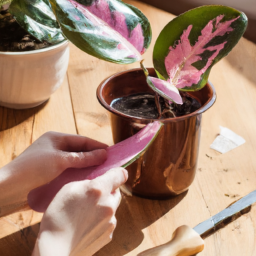
Once you have divided the plant into multiple sections, place each section in its own clean pot or container filled with a suitable potting mix. Gently press the soil around the roots to secure the plant in place.
Step 4: Provide Adequate Care
After division, it’s crucial to provide proper care to ensure the success of your new plants. Place the potted divisions in a location with the appropriate light conditions for the specific plant species. Some plants may prefer bright indirect light, while others thrive in full sun or shade.
Water the divisions thoroughly after planting, making sure the soil is evenly moist. Avoid overwatering, as it can lead to root rot and other issues. Monitor the moisture level regularly and adjust your watering schedule accordingly.
Depending on the plant species, you may also need to provide additional care such as fertilization, pruning, or protection from pests. Research the specific requirements of your plants and provide the necessary care to promote healthy growth.
With time and proper care, your divided sections will develop into individual plants, expanding your plant collection and bringing joy to your garden.
Remember, division propagation is a rewarding and sustainable way to multiply your plant collection. By mastering this technique, you can create new plants, share them with friends and family, or even start your own plant nursery. So, roll up your sleeves, grab your tools, and embark on the exciting journey of division propagation!
Common Mistakes to Avoid When Dividing Plants for Propagation
Dividing plants for propagation is an excellent way to expand your plant collection and create new plants without spending a fortune. However, there are some common mistakes that many beginners make when attempting division propagation. In this guide, we will discuss these mistakes and provide you with valuable tips to ensure successful plant division.
1. Choosing the Wrong Time to Divide
Timing is crucial when it comes to dividing plants for propagation. One of the most common mistakes is dividing plants at the wrong time of the year. It’s important to divide plants when they are dormant or just beginning to show signs of growth in early spring or late fall. Dividing plants during their active growth period can cause stress and hinder their ability to establish new roots.
Another aspect of timing to consider is the age of the plant. Dividing young plants that have just reached maturity is ideal as they have a better chance of recovery and establishing themselves as separate individuals. Older plants, on the other hand, may have a more extensive root system, making division more challenging and potentially damaging.
Always research the specific plant species you intend to divide to determine the best time for division. This will ensure the highest success rate and minimize stress on the plants.
2. Neglecting Proper Preparation
Preparing both the plant and the division site is essential for successful propagation. Neglecting proper preparation is a common mistake that can lead to poor results. Before dividing a plant, make sure to water it thoroughly a day or two in advance. Moist soil makes it easier to separate the roots without causing excessive damage.
Additionally, prepare the division site by loosening the soil and adding organic matter or compost to improve its fertility. This will provide the newly divided plants with the necessary nutrients and encourage healthy root development. Proper preparation sets the stage for successful division and ensures the plants have the best chance of thriving.
Remember to also clean and sterilize your tools before dividing plants to prevent the spread of diseases and infections.
3. Incorrect Division Techniques
The way you divide a plant can greatly impact its success rate. Using incorrect division techniques is a common mistake that can result in damage to the plant and failure to establish new growth. Here are a few tips to help you master division techniques:
a. Using the right tools: Ensure you have sharp and clean tools such as a garden knife or spade to make clean cuts without tearing or crushing the plant’s roots.
b. Dividing with care: Gently lift the plant from the ground, shaking off excess soil. Carefully separate the roots, ensuring that each division has enough roots and foliage to sustain itself.
c. Removing dead or damaged parts: Before dividing, inspect the plant for any dead or damaged parts. Remove these sections to promote healthier growth and prevent the spread of diseases.
By following these division techniques, you will increase the chances of successful propagation and minimize stress on the plants.
In conclusion, avoiding common mistakes when dividing plants for propagation is crucial to ensure successful and healthy growth. Remember to choose the right time for division, prepare both the plant and the division site adequately, and use correct division techniques. By doing so, you will be well on your way to multiplying your plant collection and mastering division propagation.
Advanced Techniques for Maximizing Plant Division Success
Introduction
When it comes to expanding your plant collection, division propagation is a tried and true method that allows you to multiply your plants and create new ones. In this guide, we will explore advanced techniques that will help you master division propagation and maximize your success. By following these steps, you’ll be able to propagate your plants with confidence and achieve impressive results.
Preparing for Division Propagation
Before diving into the advanced techniques, it’s important to ensure that you have the right tools and conditions for successful division propagation. Here are some key steps to follow:
1. Choosing the Right Time
Timing is crucial when it comes to division propagation. The best time to divide most plants is during their dormant period, which is typically in early spring or late fall. However, some plants may have specific requirements, so it’s essential to research the specific needs of the plant you wish to propagate.
2. Gathering the Necessary Tools
To ensure a smooth division process, gather the following tools:
– Sharp, sterilized gardening shears or a knife
– Clean containers or pots with drainage holes
– High-quality potting soil or a suitable growing medium
– Watering can or spray bottle
– Rooting hormone (optional)
– Labels for identification
3. Preparing the Division Site
Before dividing your plant, prepare the division site by watering it thoroughly the day before. Moist soil makes it easier to separate the plant’s root system without causing excessive damage.
Advanced Techniques for Division Propagation
1. Assessing the Plant’s Health
Before dividing a plant, it’s essential to assess its overall health. Look for signs of disease, pests, or any other issues that could affect the success of the division. Healthy plants are more likely to thrive after division.
2. Choosing the Right Division Method
There are various division methods you can use depending on the type of plant. Here are three common techniques:
– Root Division: This method involves separating the plant by dividing the root system into multiple sections. It works well for plants with clumping or fibrous roots, such as daylilies or hostas.
– Crown Division: Crown division is suitable for plants with a central crown, such as ferns or irises. Carefully separate the crown into multiple sections, ensuring each section has enough roots and foliage to support its growth.
– Rhizome Division: Rhizomes are horizontal underground stems that produce roots and shoots. Plants like bearded irises or cannas can be divided by cutting the rhizomes into sections, ensuring each section has healthy roots and foliage.
3. Division Techniques
Once you’ve chosen the appropriate division method, follow these steps:
– Gently remove the plant from its container or dig it out from the ground, being careful not to damage the roots.
– Shake off excess soil and carefully separate the plant into sections using sterilized shears or a knife. Ensure each section has sufficient roots and foliage.
– If the plant has large, dense roots, you may need to use two gardening forks to pry the sections apart gently.
– Trim any damaged or diseased roots, ensuring clean cuts to promote healthy regrowth.
– If desired, apply rooting hormone to the cut ends of the divisions to encourage root development.
– Plant each division in its own container or directly into the ground, ensuring the roots are well-covered with soil or growing medium.
– Water thoroughly and place in a suitable location with appropriate light and temperature conditions for the specific plant.
Caring for Divided Plants
After dividing your plants, proper care is crucial for their successful establishment and growth. Here are some essential tips to follow:
– Water regularly: Keep the soil consistently moist, but avoid overwatering, which can lead to root rot. Adjust watering frequency based on the plant’s specific needs.
– Provide adequate light: Most divided plants require bright, indirect light to thrive. Place them in a location that receives the appropriate amount of sunlight for their species.
– Monitor humidity levels: Some plants benefit from increased humidity, especially during the initial stages of division propagation. Consider using a humidifier or misting the plants regularly.
– Fertilize appropriately: Apply a balanced, slow-release fertilizer or a diluted liquid fertilizer according to the plant’s specific requirements. Avoid overfertilization, as it can damage the delicate root systems of newly divided plants.
– Monitor for pests and diseases: Regularly inspect your divided plants for any signs of pests or diseases. Treat any issues promptly to prevent them from spreading.
Conclusion
By mastering advanced techniques for maximizing plant division success, you can expand your plant collection and create a thriving garden. Remember to choose the right time for division, gather the necessary tools, and prepare the division site properly. Assess the plant’s health, choose the appropriate division method, and follow the division techniques carefully. Finally, provide proper care for your divided plants, ensuring adequate watering, light, humidity, and fertilization. With these steps, you’ll be well on your way to multiplying your plant collection through division propagation.
Here’s what we learned
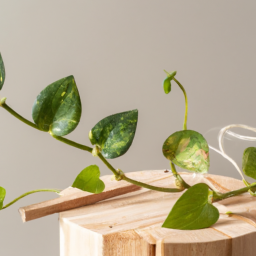
If you’re a plant lover like me, you’ve probably found yourself wishing you had more of your favorite plants. Well, I have good news for you: division propagation is the answer to multiplying your plant collection! This technique allows you to take one healthy plant and turn it into several, giving you more greenery to enjoy or share with fellow plant enthusiasts.
So, how does division propagation work? It’s actually quite simple. First, you’ll need to identify a mature plant that is ready for division. Look for plants that have outgrown their pots or have multiple stems emerging from the base. Once you’ve found the perfect candidate, gently remove it from its pot and carefully separate the root ball into two or more sections. Be sure to use a clean, sharp knife or garden shears to avoid damaging the plant. Then, simply repot each divided section into its own container with fresh potting soil, water thoroughly, and voila! You’ve just multiplied your plant collection.
FAQ Compilation:
Q1: What is division propagation?
A1: Division propagation is a method of multiplying your plant collection by separating a mature plant into multiple smaller plants, each with its own root system. It involves carefully dividing the plant’s root ball or rhizome into sections and replanting them as individual plants.
Q2: Which plants can be propagated through division?
A2: Many perennial plants can be propagated through division, including but not limited to hostas, daylilies, irises, and ornamental grasses. It’s important to research the specific plant you wish to propagate to ensure it is suitable for division propagation.
Q3: When is the best time to divide plants?
A3: The ideal time to divide plants varies depending on the species, but in general, it is best to divide them during their dormant season or early spring before new growth starts. This allows the plants to recover and establish themselves before the growing season begins.
Q4: How do I divide a plant properly?
A4: To divide a plant, start by carefully digging up the entire plant and gently removing excess soil from the roots. Then, identify natural divisions or use a clean, sharp tool to separate the plant into smaller sections. Ensure that each section has enough roots and foliage to support its growth. Finally, replant the divided sections in suitable locations, providing proper care and watering.
Q5: What care should I provide to divided plants?
A5: Divided plants require some extra care to ensure their successful establishment. After replanting, water the divided sections thoroughly to help them settle in. Provide appropriate sunlight, soil conditions, and regular watering as per the specific plant’s requirements. Keep an eye out for any signs of stress or wilting, and provide additional care if needed.
Dr. Olivia Green is a botanist with over two decades of experience in indoor plant cultivation. She holds a Ph.D. in Plant Biology and has dedicated her career to researching plant behavior in controlled environments. Dr. Green is passionate about helping plant enthusiasts master the art of indoor gardening through her extensive knowledge and practical insights.